


QSTD5304 Digital Video Recorder User Manual
16
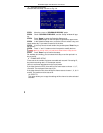
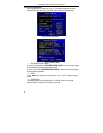
8. SCHEDULE RECORD
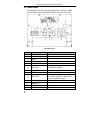
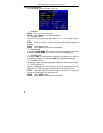
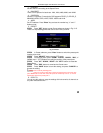
Schedule Record Setup is shown as Fig. 3.8.
Fig 3.8 Schedule Setup
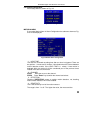
STEP1 Move the cursor to "SCHEDULE RECORD" option
STEP2 Check "SCHEDULE RECORD", and the “Setup” window will pop
up.
STEP3 Press "Setup" to enter the Schedule Setup menu.
Press "ESC" button on the front panel to get back to upper menu.
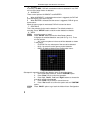
STEP4 In the Schedule Setup menu, move the cursor to select a day, and
check “whole day” if you want to record all of the time.
STEP5 If you only want to record certain time periods press "Enter" key to
set up time.
STEP6 Press "+" and "-" buttons on the front panel to modify the time.
Notice: When you use the mouse, you need roll the middle wheel to modify the time.
STEP7 Press "Enter" key to confirm the setup.
On weekday and holiday, you can select whole day or set four periods in a
day to record.
9. FRAME RATE SETUP
Frame rate is the number of pictures recorded each second. If choosing 15,
the picture-recording rate is 15 frames per second.
User can set frame rates based on the record mode.
If the video format is NTSC, there will be five frame rates to choose: 1, 3, 7,
15 and 30. The maximum frame rate is 30.
If the video format is PAL, there will be five frame rates to choose: 1, 3, 6, 12
and 25. The maximum frame rate is 25.
10. COPY TO
This option allows you to copy the settings of this channel to other selected
channels.