


3-14 2002 Avalanche
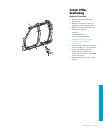
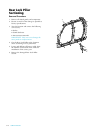
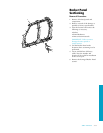
Rocker Panel
Sectioning
Installation Procedure
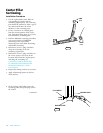
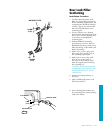
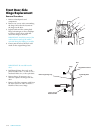
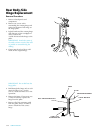
1. Cut the replacement Rocker Panel in
corresponding locations to fit the
remaining original panel. The sectioning
joint should be trimmed to allow a gap of
one-and-one-half times the metal thickness
at the sectioning joint.
2. Create a 100␣ mm (4␣ in.) backing plate
from the unused portion of the service
part. Trim the backing plate as necessary
to fit behind the sectioning joint.
3. Perform additional sectioning procedures
as necessary. Refer to Windshield
Sectioning; Front Lower Pillar Sectioning;
Rear Lock Pillar Sectioning; and Center
Pillar sectioning.
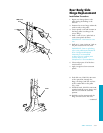
4. Drill 8␣ mm (5/16␣ in.) plug weld holes along
the sectioning cut on the remaining
original part.
5. Drill 8␣ mm (5/16␣ in.) plug weld holes in
the service panel as necessary in the
locations noted from the original panel and
along the sectioning cut.
CAUTION: FOAM SEALERS ARE
FLAMMABLE AND SHOULD BE
REMOVED FROM ALL WELD
LOCATIONS.
6. Prepare the mating surfaces as necessary.
7. Apply weld-through primer to all bare
metal surfaces.
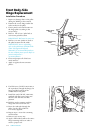
8. Fit the backing plate halfway into the
sectioning joint, clamp and plug weld to
the vehicle.
9. Align the Rocker Panel to adjacent panels
using three-dimensional measuring
equipment.
10. Plug weld service part in position.
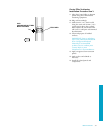
11. Make 25␣ mm (1␣ in.) stitch welds along the
seam with 25␣ mm (1␣ in.) gaps between
them, then go back and complete the
stitch weld. This will create a solid joint
with minimal heat distortion.
12. Clean and prepare all welded surfaces.
IMPORTANT: Prior to refinishing, refer to
the publication GM4901M-D-2000 “GM
Approved Refinish Materials” for
recommended products. Do not combine
paint systems. Refer to paint manufacturer’s
recommendations.
13. Apply an approved anti-corrosion primer.
14. Apply sealers and refinish as necessary.
15. Install all related panels and components.
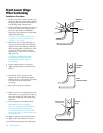
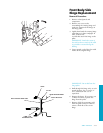
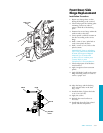
100 MM
(4 IN)
BACKING PLATE
GAP = ONE AND ONE-HALF TIMES
THE THICKNESS OF THE METAL