


Page 3
OPERATING THE SYSTEM
1. Arming the System
A. Exit the vehicle, and close and lock all doors.
B. Press and release the larger arming button on the keychain
transmitter. The system will respond with one single chirp.
C. The red dash mounted L.E.D. will beginto flash, and after approxi-
mately six seconds,the shock sensing feature ofthe system will be
activated. The voltage sensing circuit will begin its countdown, and
afterapproximatelythree minutes,openingalightactivated doorwill
trigger the alarm.
IMPORTANT ! If the WHITE loop wire was cut during the installation
procedure, thevoltage sensingfeature of thealarm willbecome active
six seconds after arming the system ( see COMPLETING THE IN-
STALLATION, WHITE LoopWire ). You willnot need to waitthe three
minutes before opening a door will cause the alarm to trigger.
2. Protection While the System is Armed
A. Opening a door ( or any light activated entry point ), will cause the
alarmtoimmediately soundforthecomplete 60secondalarmcycle.
B. While the system is armed, the red dash mounted L.E.D. will
constantly flash, discouraging any would be thieves.
C. Any light impact to the vehicle glass or body panels will cause the
system to immediately sound the warning chirps, discouraging any
further attempts to enter the vehicle.
D. Any forceful impact to the vehicle will cause the system to immedi-
ately trigger for the complete 60 second alarm cycle. At the end of
the cycle, the alarm will re - arm itself, and resume monitoring the
vehicle.
3. Disarming the System
A.When youreturn to thevehicle, pressand releasethe largerarming
buttononthe keychaintransmitter.Thesystemwillrespond withtwo
chirps.
B.The reddashmounted L.E.D.will turnoff, indicatingthatthe system
is disarmed, and it is safe to enter the vehicle.
4. Disarming After an Intrusion
Whendisarming, ifthesystemresponds withfourchirps,you arebeing
alerted thatthe alarmwas triggeredduring yourabsence. Additionally,
the red dash mounted L.E.D. will blink3 times .. pause .. blink 3 times
.. etc., to provide an added visual indication that the alarm had been
triggered.
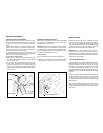
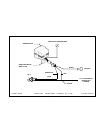
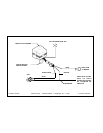
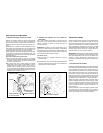
COMPLETING THE INSTALLATION
You will notice (3) additional wires, which come directly out of the
rubber wireexit boot from thesiren control module,and are not partof
the main harness. These wires are used to customize the installation,
and are required in some vehicles.
1. Thin BLACK Wire
Thisistheantenna wireforthereceiverthatisbuiltinto thesirencontrol
module. Fully extend this wire, and route it as high in the engine
compartment as possible, for maximum transmitter range.
2. WHITE Loop Wire
This wire exits the rubber boot, and immediately loops back into the
rubber boot.
Three minutes after the alarm has been armed, the voltage sensing
circuitry becomes active. This voltage sensing monitors the voltage
levelof thevehicle, andwhen itsees achange (i.e. adooropens, and
the interior light turns on ), the alarm is triggered.
Many vehicles incorporate an electronic cooling fan, which will auto-
matically switch on after the vehicle has been turned off. If this fan
switcheson shortlyafterthe alarmhasbeen armed,thesystem willnot
trigger due to the three minute delay.
If your vehicle does not have an electronic cooling fan which turns on
afterthevehicle hasbeenturnedoff,you mayelecttobypass thethree
minute arming delay of the voltage sense circuit. The system can be
modified sothat sixseconds afterarming, thevoltage sensingcircuitry
becomes active. The three minute time delay can be eliminated by
cutting the WHITE wire loop. After cutting the WHITE wire loop,
individually insulate both ends of the wire with electrical tape.
Donotcutthisloopif yourvehicleisequippedwithanelectroniccooling
fan, as you will experience false alarms.
3. GREEN Loop Wire
This wire exits the rubber boot, and immediately loops back into the
rubber boot.
Cutting thiswirewill eliminatethe voltagesensing featureof thealarm.
When this wire is cut, opening the doors will not trigger the system.
This loopwire shouldbe cutonly ifyou wantto protectthe vehiclefrom
sudden impactsto the glassor body panels,but do notwant the alarm
to trigger when a door has been opened.
ADJUSTING THE SENSITIVITY OF THE SHOCK SENSOR
The purpose of a shock detector is to “sense” strong impacts to the
vehicle’s glass andbody panels, but ignorelight bumps to thevehicle.
This alarm is programmed to report these impacts in two ways.
Alighter impactwill causethe alarmto sounda seriesofshort “chirps”,
warning anyone tampering with the vehicle to stop immediately.
A more forceful impact will cause the alarm to sound for it’s full 60
second cycle, informing you that a serious violation attempt has
occurred.
IMPORTANT! Settingthesensitivity oftheshock sensortoohigh will
cause false alarms. A substantial amount of force is required to
actually breakautomotive glass, andthe shock sensor shouldbe set
accordingly.
Before proceeding with the adjustment, verify that all screwssecuring
thesiren controlmodule tothe bracket,andsecuring thebracket tothe
vehicle, are securely tightened.
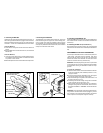
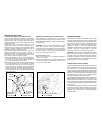
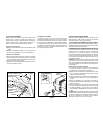
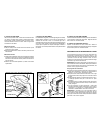
To adjust the shock sensor;
A. Locate and remove the small rubber plug on the back of the siren
control module.
B. Gently turn the adjustment screw fully counter - clockwise, then
clockwise approximately 1/8 of a turn. Do not over turn this screw,
as maximum rotation is approximately 270°. You should stop
applyingpressure assoon asyou feelaslight amountof resistance.
C.Closethe hood,armthealarm ( “1 CHIRP“),and allowsixseconds
for the shock sensor to stabilize.
D. Firmlystrike thefront bumperofthe vehiclewith theside ofa closed
fist, considering the amount of force required to break a window.
CAUTION ! Neverperform this test onthe vehicle’s glass,as you may
break a window.
E. If the alarm did not sound, or if only the warning chirps were
activated, then the sensitivity will need to be increased. Disarm the
alarm,andopen thehoodtogainaccessto thesirencontrolmodule.
F. Gently turn the adjustment screw approximately 1/8 turn clockwise
( increasing sensitivity ), and repeat the test.
G. Repeatthis procedure untila firmstrike causes thealarm totrigger,
and a less forceful impact causes the alarm to sound the warning
chirps.
H. When the adjustment is set, replace the rubber plug on the backof
the siren module.