


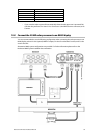


IMPORTANT: Make sure the heading sensor is calibrated according to the manufacturer's
recommendations.
1. When performing a sea trial of the vessel, set a straight course for a solid object such as a
lighthouse, jetty or radar navigation marker that is at least 1 nautical mile distant as
referenced on the chart.
2. Press
CHART to display the chart then press Overlay to show the radar echoes overlain
on the chart.
3. Set the chart rotation to North-Up by pressing
Rotate several times until North-Up is
displayed.
4. Find a target at least 1 nautical mile distant that appears on both the chart and the radar
overlay. Do not choose a beach or a buoy as a target; instead, choose an obvious land
pattern or solid object with a fixed reference point such as a jetty, lighthouse, or pier.
5. Zoom in as necessary to place identifiable objects near the outer edge of the screen.
6. Press
Control so that it displays Radar.
7. Press
Page 2, Page 3, Page 4, and Install... .
8. Press Heading Calibrate then press the Cursor Pad left and right to rotate the
radar image so that the radar target matches its compass heading on the chart and lines up
on top of the position shown on the chart.
9. If possible, check targets in all quadrants to ensure accurate adjustment.
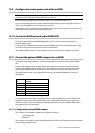
14.4.6 Set the heading calibration (heading sensor not installed)
The heading calibration rotates the radar image on the screen so that a target dead ahead
corresponds to a bearing of 0° on the screen.
1. Press
RADAR so that the navigator displays radar only.
2. Find a target at least 1 nautical mile distant. Choose an obvious land target or solid object
with a fixed reference such as a jetty, light house or pier. Steer the vessel until the reference
target is directly head up then maintain this heading.
3. Zoom in as necessary to place the reference target near the outer edge of the screen.
4. Press
Page 1, Page 2
5. Check that the chart rotation (
Rotate button) is set to Hdg Up.
6. Press
Page 2, Page 3, Page 4 and Install... .
7. Press
Heading Calibrate then press the cursor pad left and right to rotate the radar
image so that the reference target is at 0° (vertical from the centre of the radar sweep).
14.5 Adjust the appearance settings
The Mode, Rain Clutter, Sea Clutter and Gain are usually set to automatic mode to obtain an excellent
image under most conditions and, by default, allow you to see any approaching weather rain cells for
maximum safety. However, these settings may need minor adjustments depending on the location of
the radar.
To access these controls, press
Page 2 from the main radar screen.
The Mode key determines how the gain and clutter keys work. It has the following settings:
Auto 1 and Auto 2 are for normal, open-water conditions. The two automatic modes
can be optimized for two different conditions.
Harbor automatically optimizes the radar settings for use in a harbor. This is the default
setting.
Range Rider is a Northstar exclusive feature recommended for use when manual
settings are required. You can make changes to the clutter and gain settings for different
Northstar 25 kW Radar Installation Manual
43