


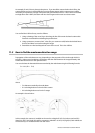


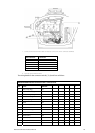

11.7 Install the 25 kW scanner unit
Tape the paper installation template securely to the chosen location site. Before drilling, check that:
the location site is not more than 0.6" (15 mm) thick, to ensure that you can use the bolts
supplied.
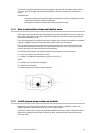
you've oriented the template correctly so that the front of the scanner unit faces the bow
and the cable inlet faces the stern.
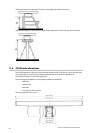
Drill the four bolt holes then remove the template and position the scanner over the bolt holes.
Slide a spring washer, then a brass washer onto each bolt. Push the bolt down through the scanner
bolt hole and the drill hole, working from the top side of the location site.
Slide a plain washer then a spring washer onto the bolt then screw two nuts onto the bolt to secure it.
Repeat this for procedure for each bolt, then tighten all the nuts so that the scanner is secure.
NOTE: Use the bolts supplied as these are hardened stainless steel and the correct length.
11.8 When to install the open array
IMPORTANT: Install the open array onto the scanner AFTER you have connected the interconnection
cable to the scanner otherwise you'll have to remove the open array from the scanner, and then re-
install it.
Northstar 25 kW Radar Installation Manual
21