


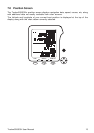
Tracker500/500i User Manual4
displayed. Pressing the Mark key will save the current boat position with a
temporary name in the range of MARK0 to MARK9. Marks are saved separately
from normal waypoints. They are simpler to create and display and are
intended to provide a simple method of marking temporary locations such as
fish strikes. See section 12.0 Marks for a more detailed description.
Route Two or more waypoints can be linked in sequence to form a route. The route
has a start and end waypoint and can be traversed from start to finish or in
reverse. Up to 20 routes can be stored in memory.
Legs Legs are the division of a route between waypoints. A route consisting of four
waypoints will have three legs.
GoTo The Goto function allows you to navigate from your current position to any
waypoint or mark. The Tracker500/500i will guide you to your destination with
a graphical highway screen and continuously updated navigational data.
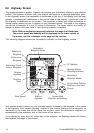
1.3 Operating the Tracker500/500i
You can use your Tracker500/500i to get you back to a good fishing spot or to sail all the way
around the world. It has been designed to be easy to use for those with no formal navigation
training, but also provides accurate navigational information for the long distance sailor. No
matter how long or short your journey, it will take you straight to where you want to go.
If your main interest is in returning to previously visited locations such as good fishing spots,
you should start by reading section 11.2 on saving the current boat position as a waypoint,
then section 10.0 on how to “goto” a waypoint. It is normally advisable to take the time to
enter a descriptive name for the waypoint as it quickly becomes difficult to remember which
is which when the number of waypoints has built up. Be sure to save the position of the
launching ramp before you start out so that you can use the Tracker500/500i to find your
way back if there is fog, rain, or it gets dark on the return journey. This also applies to any
point on your outward journey where you have to change course, such as a channel
between two islands.
Note the warning in section 1.1 on the position errors introduced by SA. If you do not have
a differential (DGPS) receiver, don’t try and navigate through narrow channels in reduced
visibility or darkness unless you have a secondary method of determining a safe course,
such as a marine chart and a depth sounder.
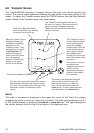
Working With Charts
If you want to navigate to a location that you don’t already have saved as a waypoint, you
will need to obtain its latitude and longitude from a marine chart. See section 11.2 on how
to create a new waypoint and enter Lat/Lon values. A pair of dividers is normally used to
measure latitude and longitude on a chart. To measure the latitude of a location, place one
point of the dividers on the location and then adjust the dividers until the other point is
straight above or below the first one and on the nearest horizontal grid line. Move the
dividers along the grid line to the latitude scale on the side of the chart. Put one point on
the grid line and the other on the latitude scale and read the value. It will be a number like
43°52·13´ N. A minute (´) is one sixtieth of a degree. The N indicates this location is in the
northern hemisphere. Unless you have a chart that covers a very small area, you won’t be
able to read the latitude scale more accurately than two decimal places of minutes. The
Tracker500/500i allows for three decimal places, so just put zero in the last place. The same
method is used to measure the longitude, using a vertical grid line and the longitude scale
at the top or bottom of the chart. The longitude will be a number like 010°32·95´ E. Three