


55
C. Preparing the Icemaker for Long Storage
CAUTION
When shutting off the icemaker for an extended time, drain out all water from
the water tank and remove the ice from the dispenser unit/storage bin. The
dispenser unit/storage bin should be cleaned and dried. Drain the icemaker to
prevent damage to the water supply line at sub-freezing temperatures, using air
or carbon dioxide. Shut off the icemaker until the proper ambient temperature
is resumed.
When the icemaker is not used for two or three days, it is sufcient to only move the control
switch to the "OFF" position, unless the icemaker will be at sub-freezing temperatures.
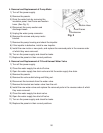
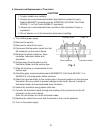
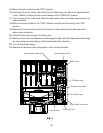
1. Remove the water from the inlet water supply line: See Fig. 11.
1) Remove the front panel.
) Move the control switch to the "OFF" position. Conrm that the service switch is in the
"CIRC" position.
3) Remove the front insulation, front frame, right side panel, and control box cover.
4) Disconnect the thermistor from the K3 connector on the control board, and unplug the
water pump connector at the water pump.
5) Wait 3 minutes, then move the control switch to the "ICE" position. Conrm that the bin
control switch is closed and calling for ice. The green BC CLOSED LED on the control
board should be on.
6) Once LED 1 and on the control board energize (the order of the LEDs from the outer
edge of the control board is 1,4,3,), close the inlet water supply line shut-off valve and
open the inlet water supply line drain valve. Allow the line to drain by gravity.
7) Disconnect the harvest water valve hose in the evaporator section and blow out the
water line to the harvest water valve using compressed air or carbon dioxide. This will
clear water from the harvest water valve.
8) Move the control switch to the "OFF" position.
9) Move the service switch to the "WASH" position and the control switch to the
"SERVICE" position.
10) Using the same hose as with the harvest water valve, blow out the wash valve using
compressed air or carbon dioxide.
11) Move the service switch to the "CIRC" position and the control switch to the "OFF"
position.
1) Remove the 4 hoses connected to the water tank. Allow the tank and hoses to
completely drain.
13) Move the control switch to the "ICE" position.
14) Using the ll water valve hose, blow the water line out using compressed air or carbon
dioxide. This will clear water from the ll water valve.