


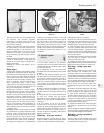
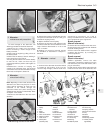
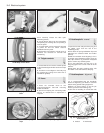
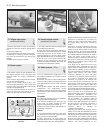

them. Carefully release the fibre optic
filaments (photos).
6 A push-button switch can be removed by
compressing its retaining tabs and pushing it
from the panel.
7 A rocker switch can be removed if its knob
is pulled off and the switch sections
withdrawn from the panel.
8 Reassembly and refitting of both types of
switches are reversals of removal and
dismantling.
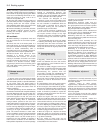
14 Tailgate contacts
1
1 Contact blocks are used to transmit power
to the heated tailgate window and to the wiper
motor.
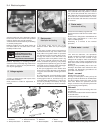
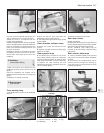
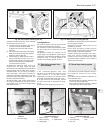
2 The block on the tailgate or the body may
be released by prising their ends with a
screwdriver (photos).
15 Horns
1
1 These are mounted close to the
engine/transmission left-hand mounting
below the radiator.
2 Apart from keeping the connecting leads
secure, no maintenance or adjustment is
required.
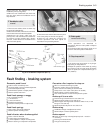
16 Headlamp bulb - renewal
1
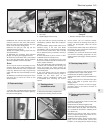
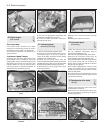
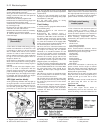
1 Open the bonnet and pull off the plug and
the rubber cover from the rear of the
headlamp (photo).
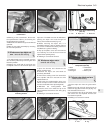
2 Prise back the spring bulbholder clips and
withdraw the combined bulb and holder
(photos).
3 Refit the new bulb. Avoid fingering it if it is
of halogen type. Should the fingers touch the
bulb, wipe it with a rag soaked in methylated
spirit to remove any residual grease.
4 Turn the bulbholder until the pip on its
flange engages in the cut-out in the rim of the
reflector.
5 Snap back the spring retaining clips, refit
the rubber cover and reconnect the plug.
17 Headlamp beam - alignment
2
1 It is recommended that the headlamp
beams are aligned by your dealer or a service
station having optical setting equipment.
2 Where an owner wishes to do the job
himself, proceed in the following way.
3 Have the car standing on a level floor with
9•6 Electrical system
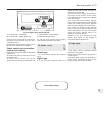
Fig. 9.3 Headlamp beam adjustment
screws (Sec 17)
A Vertical B Horizontal
16.2B Headlamp halogen type bulb16.2A Headlamp bulbholder spring
clips
14.2B Body contact block
16.1 Headlamp plug and rubber
cover
14.2A Tailgate contact block13.5B Switch panel fibre optic13.5A Withdrawing switch panel