


dbx debugging commands. See Section 2.1, the dbx(1)
reference page, or
the Programmer’s Guide for information on dbx debugging commands.
If you are unable to bring your test kernel up to a fully operational mode,
you can reboot the halted system running the generic kernel, as follows:
>>> set boot_osflags "S"
>>> set boot_file "/genvmunix"
>>> boot
Once the system is running, you can run the bcheckrc script manually
to check and mount your local file systems. Then, copy the appropriate
kernel to the root (/) directory.
When you are ready to resume debugging, copy the test kernel to
/vmunix and reset the console variables and boot the system, as follows:
>>> set boot_osflags "k"
>>> set boot_file "/vmunix"
>>> boot
When you have completed your debugging session, reset the console
variables on the test system to their normal values, as follows:
>>> set boot_osflags "A"
>>> set boot_file "/vmunix"
>>> set auto_action boot
You might also need to replace the test kernel with a more reliable kernel.
For example, you should have saved a copy of the vmunix file that is
normally used to run the test system. You can copy that file to /vmunix and
shut down and reboot the system:
# mv /vmunix.save /vmunix
# shutdown -r now
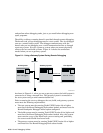
2.3.3 Diagnosing kdebug Setup Problems
If you have completed the kdebug setup as described in Section 2.3.2 and
it fails to work, refer to the following list for help in diagnosing and fixing
the setup problem:
• Determine whether the serial line is attached properly and then use the
tip command to test the connection.
Once you determine that the serial line is attached properly, log on to
the build system (or the gateway system if one is being used) as root
and enter the following command:
# tip kdebug
If the command does not return the message connected, another
process, such as a print daemon, might be using the serial line port that
you have dedicated to the kdebug debugger. To remedy this condition,
do the following:
2–42 Kernel Debugging Utilities