


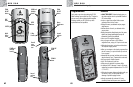


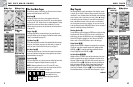


2.1
MAP PAGE
13
14
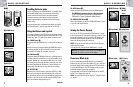
2.2
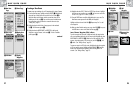
GAUGES PAGE
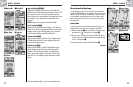
Moving Around: Details
Ẅ Compass
ẅ Select Options
ẇ Bearing
Ẇ Pointer
Settings
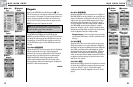
Gauges Page Ẅ
The Gauges page displays a compass that indicates direction of travel. It can
show the direction you are currently traveling or the direction from your current
position to the next waypoint in your navigation.
Selecting Options Ẅ ẅ
From the Gauges page, press and release the ENTER button to display the
Gauges Page Options menu. Push the JOYSTICK up or down to scroll through
the menu sections, then press the ENTER button to go to the highlighted
option. Use the JOYSTICK again to highlight your choice, then press the
ENTER button to select it. Press the PAGE button to return to the main page.
Pointer Options ẅ Ẇ ẇ Ẉ ẉ Ẋ
Highlight and select POINTER to designate the compass display information
about your course Ẇ. Highlight and select BEARING to make the compass
indicate the direction to your next waypoint ẇ. Highlight and select COURSE
to make the compass indicate direction to your next waypoint with arrows
that show if you are on course Ẋ or left ẉ or right Ẉ of course. This
display also shows how many feet or meters off course you are currently.*
continued
Ẉ Right of
Course
Ẋ On Course
*See “Using the Nav Data Page,” page 18, to learn about this feature.
Using the Gauges Page
ẉ Left of Course
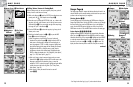
Ẉ Arrow Cursor
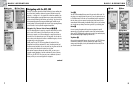
Ẋ Waypoint or
POI Detail
ẋ City/Town
Detail
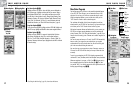
Utilizing Various Features in Panning Mode
While in panning mode, you can access waypoints, cities/towns, points of
interest, tracks or routes shown on the map.
1. While on the Map page Ẅ, push the JOYSTICK in any direction to enter
panning mode. An arrow-shaped cursor will appear ẅ.
2. Move the cursor by pushing the JOYSTICK left, right, up, or down to the
waypoint, city/town, point of interest, track or route you want to access
information about Ẉ. If the cursor reaches an edge of the map image,
the image will “pan” in that direction Ẇ.
3. Press the ENTER button ẉ to select the waypoint, city/town, point of
interest, track or route.
4. Select from the detail’s options (see Ẋ or ẋ) or press the PAGE
button ẇ to return to the Map page.
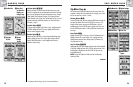
• Select a waypoint or point of interest. The name, location and
elevation of that point will appear Ẋ. Highlight and select GOTO to
either return to the Map page to navigate to the selected point, or
cancel the navigation if “GoTo” is already in progress. Highlight and
select MAP to display the Map page with the selected point centered.
Highlight and select EDIT to change the name, symbol, location
coordinates or elevation of the selected point. Highlight and select
DELETE to delete the selected point. (See “Waypoints, Select Option”,
page 19, or “POI, Select Option”, page 35.)
• Select a city/town to view its name and country and your current
distance from it ẋ. Highlight and select GOTO to either return to the
Map page to navigate to the selected city/town, or cancel the
navigation if “GoTo” is already in progress. Highlight and select MAP to
re-center the map on the chosen city/town. (See “Cities/Towns,
Select Option”, page 33.)
• Select a track or route, the name of that track or route will
appear Ẍẗẻ.
ẉ Enter Button
Ẍ Track Detail
ẗẻ Route Detail