


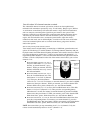

a. Proximity Sensor alarm zone: Lean into the passenger compartment. You’ll hear
a chirp when the zone detects your presence. Ideally, it should chirp when you
lean over the driver’s seat, but remain silent as you lean toward the window.
b. Proximity Sensor warning zone: Lean toward the driver’s window. You’ll hear a
chirp when the zone detects your presence. Ideally, it should chirp only when you
move within one foot of the vehicle, as a thief would do to see what was inside.
c. Piezo Sensor alarm zone: Firmly
“thump”
the top of the window pillar. You will
hear a chirp if the strike was firm enough to trigger the alarm zone of the sensor.
d. Piezo Sensor warning zone: “Thump” the top of the window pillar with
somewhat less force than noted above. You will hear a chirp if the strike was firm
enough to trigger the warning zone of the sensor.
3. If you are not satisfied with the detection level and wish to increase sensitivity, press
button 2 on your remote control. To decrease it, press button 4. Each time you increase
sensitivity, the siren will chirp in higher and higher pitched tones to confirm the higher
sensitivity setting. Conversely, lower and lower tones confirm each sensitivity decrease.
Three normal tone chirps indicate minimum and maximum settings. There are 32
sensitivity levels for each of the Proximity Sensor’s two zones; the alarm zone of the
Piezo Sensor also has 32 levels, while the less critical warning zone has 16 steps.
4. Repeat steps 2 and 3 until you are satisfied with the sensitivity, then press button 1
to record the new sensitivity setting and exit the sensor test/adjust mode (you’ll hear
three chirps to confirm exit). You may now either repeat steps 1–4 for the other
sensor and/or sensor zone, or press button 1 again to arm the system.
Sound complicated? It really isn’t, there’s just a lot of explanation of what’s happening
with each step. All you really have to do is the actions noted in
bold type
. Give it a try.
Remote controlled override of one or both sensor zones
Transmitting channel 10 within 10 seconds of arming the system will override the
exterior warning zone of the Proximity Sensor (you’ll see 4 parking light flashes to
confirm the zone override). This is useful when parking in an area with heavy pedestrian
traffic. Transmitting channel 10 again within the 10 second period will override both
zones of the sensor for those times when you must leave a passenger or pet in the
vehicle. The sensor zones are automatically restored the next time you arm the system.
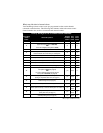
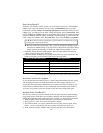
How to interpret the LED status indicator
The LED on your car’s dashboard or console will inform you of the system status:
LED Condition Meaning
Off
System is disarmed and in normal operating mode (i.e., valet mode is off)
On
Valet mode is on, the vehicle can be driven or serviced without having to disarm
Flashing
System is armed and protecting your vehicle
Pause between flashes
Either a malfunction occurred or an intrusion was attempted (see pages 24-25)
Automatic battery-saving mode
To conserve vehicle battery power (the LED draws more current than the entire control
unit) if the system has remained continuously armed for 48 hours, the flash rate will
automatically slow to half the normal rate. After 96 hours, it slows to one-quarter.
22