


7
VRX878RVD
5
VRX878RVD
6
VRX878RVD
English
Owner’s manual
English Français Deutsch Italiano
Nederlands
Español Svenska
English
Owner’s manual
Português Dansk
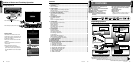
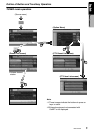
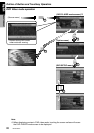
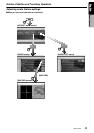
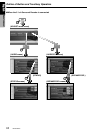
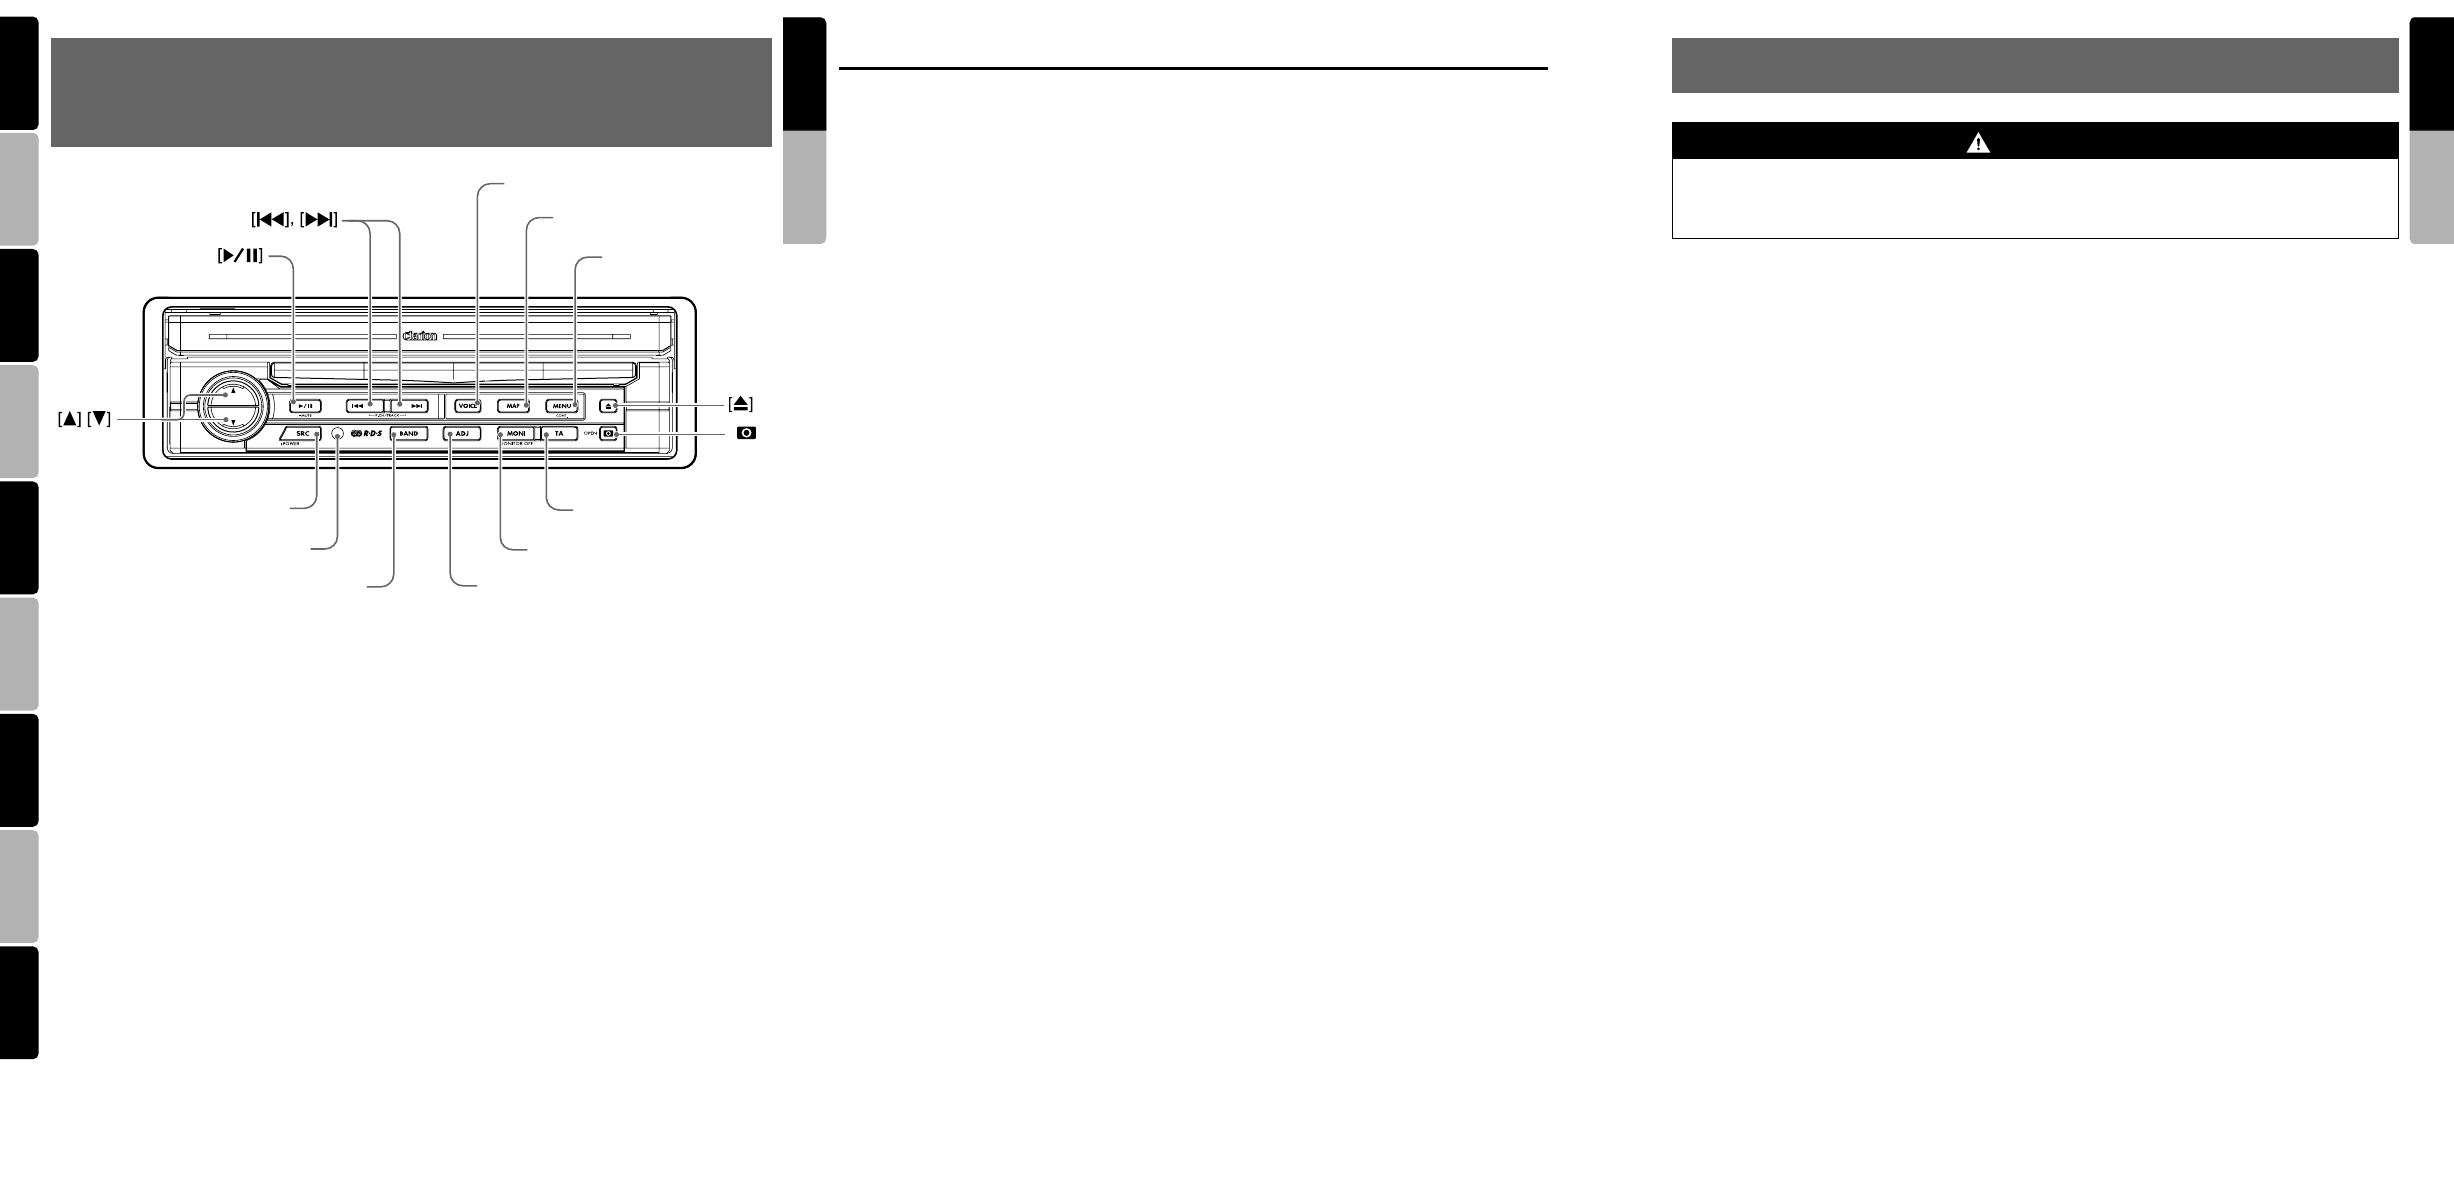
2. CONTROLS/COMMANDES/REGLER/CONTROLLI/REGLAARS/
CONTROLES/KONTROLLER/CONTROLOS/KONTROLLER
[
BAND
]
[
TA
]
Sensor
[]
[
ADJ
]
[
SRC
]
[
MONI
]
[
VOICE
]
[
MENU
]
[
MAP
]
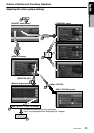
Note : Be sure to unfold this page and refer to the front diagrams as you read each chapter.
*The control panel can be detached to prevent theft. For details, see the pages entitled “DCP (Detachable
Control Panel)”.
Remarque : Veuillez déplier cette page et vous référer aux schémas quand vous lisez chaque chapitre.
*Le panneau de commande peut être détaché de l’unité pour éviter tout vol. Pour plus d’informations,
reportez-vous au chapitre “DCP (Panneau de Commande Amovible)”.
Hinweis : Breiten Sie diese Seite aus, und beziehen Sie sich beim Lesen der einzelnen Kapitel auf die Diagramme
auf der Vorderseite.
*Das Bedienfeld kann zum Diebstahlschutz abgenommen werden. Details finden Sie auf den Seiten mit dem
Titel “DCP (Abnehmbares Bedienfeld)”.
Nota : Aprire la pagina e fare riferimento alle illustrazioni a fronte durante la lettura di ciascun capitolo.
*
Il pannello di controllo può essere rimosso per evitarne il furto. Per ulteriori informazioni, consultare la sezione
“DCP (Frontalino Estraibile)”.
Opmerking :
Vouw deze pagina uit en raadpleeg de diagrammen aan de voorzijde tijdens het doornemen van de hoofdstukken.
*Het bedieningspaneel kan worden afgenomen om diefstal te voorkomen. Zie de pagina’s met de titel
“DCP (Afneembaar Bedieningspaneel)” voor meer informatie.
Nota : Cuando lea los capítulos, despliegue esta página y consulte los diagramas.
*Puede extraer el panel de control para evitar que lo roben. Para obtener más información, consulte las
páginas del apartado “DCP (Panel de Control Extraíble)”.
Anmärkning: Kom ihåg att vika ut den här sidan och hänvisa till diagrammen när du läser varje kapitel.
*Kontrollpanelen kan tas bort för att förhindra stöld. Mer information finns på sidorna
“DCP (Löstagbar Kontrollpanel)”.
Nota : Ao ler cada capítulo, desdobre esta página e consulte os diagramas.
*Pode remover o painel de controlo para evitar que o roubem. Para obter mais informações, consulte as
páginas “DCP (Painel de Controlo Amovivel)”.
Bemærk
: Husk at folde denne side ud og se på frontdiagrammerne, mens du læser hvert kapitel.
*Kontrolpanelet kan tages af for at forhindre tyveri. Der er oplysninger på siderne “DCP (Detachable Control
Panel/Aftageligt kontrolpanel)”.
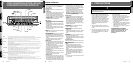
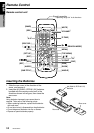
Names of Buttons
Note:
• Be sure to read this chapter while referring to the
front diagrams for chapter “2. CONTROLS” on
page 5 (unfold).
[E], [e] buttons
• Use these buttons to increase/decrease the
volume.
[p] button
• Press this button to enter the play pause mode
in the DVD PLAYER/iPod/changer modes.
Press the button again to resume playback.
• Keep pressing this button more than 1 second
to mute the sound in the DVD PLAYER/iPod/
changer modes.
• Press this button to mute the sound in the
TUNER/TV/VISUAL/DAB modes.
[SRC] button
• Press this button to turn on the power. Keep
pressing this button more than 1 second to turn
off the power.
• When the liquid crystal panel is closed, press
this button to change to the next mode such as
TUNER mode.
• When the liquid crystal panel is open, press
this button to display the Source menu screen
to switch the mode.
Sensor
• Receiver for the remote control unit (operating
range: 30° in all directions).
[R], [F] buttons
•
Use these buttons to change to the previous/next
preset station in the TUNER/TV/DAB modes.
• Use these buttons to select a track in the CD,
Video CD, MP3/WMA, iPod and CD changer
modes.
• Use these buttons to select a chapter in the
DVD video and DVD changer modes.
[BAND] button
• Press this button to switch the receiving bands
for TUNER/TV/DAB modes. Keep pressing
this button more than 1 second to switch the
Seek/Manual tuning modes.
• Use this button to move to the first track in the
CD, Video CD and iPod modes, or the first
chapter in the DVD video mode.
• Use this button to move to the next folder in the
MP3/WMA mode.
• Use this button to switch to the next disc in the
changer modes.
• Keep pressing this button more than 1 second
to play all tracks in the iPod mode.
[VOICE] button
*1
• Press this button to show the Voice screen of
the navigation system in the Navigation mode.
• Pressing this button in the audio/visual modes
changes to the Navigation mode and changes
the navigation system to the voice input mode.
[MAP] button
*1
• Press this button to show the Map screen of
the current location in the Navigation mode.
• Pressing this button in the audio/visual modes
changes to the Navigation mode.
• Pressing this button switches the liquid crystal
panel to a Visual input screen to lock the
monitor (To enable this function, go to the
GENERAL menu (within the ADJUST menu),
and touch the [CONNECT] key, and select the
desired item other than “NONE”).
[MENU] button
*1
• Pressing this button in the Navigation mode
shows the Menu screen of the Navigation
system.
• When the menu screen of a DVD video/Video
CD is displayed, pressing this button displays
the Key Pad on the screen. When the other
screen than the menu screen is displayed,
keep pressing this button more than 1 second
to display the Key Pad.
[ADJ] button
*1
• Press this button to enter/exit the ADJUST
mode to change the settings.
[MONI] button
*1
• Press this button to enter/exit the Monitor
Adjust mode.
• Keep pressing this button more than 1 second
to turn off the back light of the liquid crystal
panel.
[TA] button
• Press this button to turn on/off the TA (Traffic
Announcement) standby mode.
• Keep pressing this button more than 1 second
in the DAB mode to turn on/off the Information
standby mode.
[o] (EJECT) button
• Use this button to eject the disc set in this unit.
[P] (OPEN) button
• Use this button to open/close the liquid crystal
panel.
• Keep pressing this button more than 2
seconds so that the liquid crystal panel is
positioned horizontally when the liquid crystal
panel is open (Air Conditioner Operation
mode).
• When the liquid crystal panel closed, keep
pressing this button more than 5 seconds to
perform the panel calibration function to
memorize the maximum angle of the liquid
crystal panel.
Note:
*1: This button does not work when the liquid crystal
panel is closed.
3. PRECAUTIONS
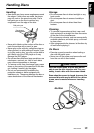
1. When the inside of the car is very cold and the
player is used soon after switching on the
heater, moisture may form on the disc (DVD/
CD) or the optical parts of the player and
proper playback may not be possible. If
moisture forms on the disc (DVD/CD), wipe it
off with a soft cloth. If moisture forms on the
optical parts of the player, do not use the
player for about one hour. The condensation
will disappear naturally allowing normal
operation.
2. Driving on extremely bumpy roads which
cause severe vibration may cause the sound
to skip.
3. This unit uses a precision mechanism. Even
in the event that trouble arises, never open
the case, disassemble the unit, or lubricate
the rotating parts.
4. TV broadcast reception (when the optional TV
tuner is connected)
When receiving the TV broadcast, the
strength of the signals changes since the car
is moving, so in some cases it may not be
possible to receive clear pictures.
• TV signals are strongly linear, so reception
is affected by buildings, mountains and
other obstacles.
• External factors such as electric train lines,
a high voltage lines, and signal devices may
disturb the picture or cause noise.
* If the reception is poor, switch to a station with
good reception.
INFORMATION FOR USERS:
CHANGES OR MODIFICATIONS TO THIS
PRODUCT NOT APPROVED BY THE
MANUFACTURER WILL VOID THE
WARRANTY.
WARNING
For your safety, the driver should not watch the DVD video/TV/VTR or operate the controls
while driving. Please note that watching and operating the DVD video/TV/VTR while driving are
prohibited by law in some countries. Also, while driving, keep the volume to a level at which
external sounds can be heard.