11
MAP Page Layering Options utilizing TruView Technology
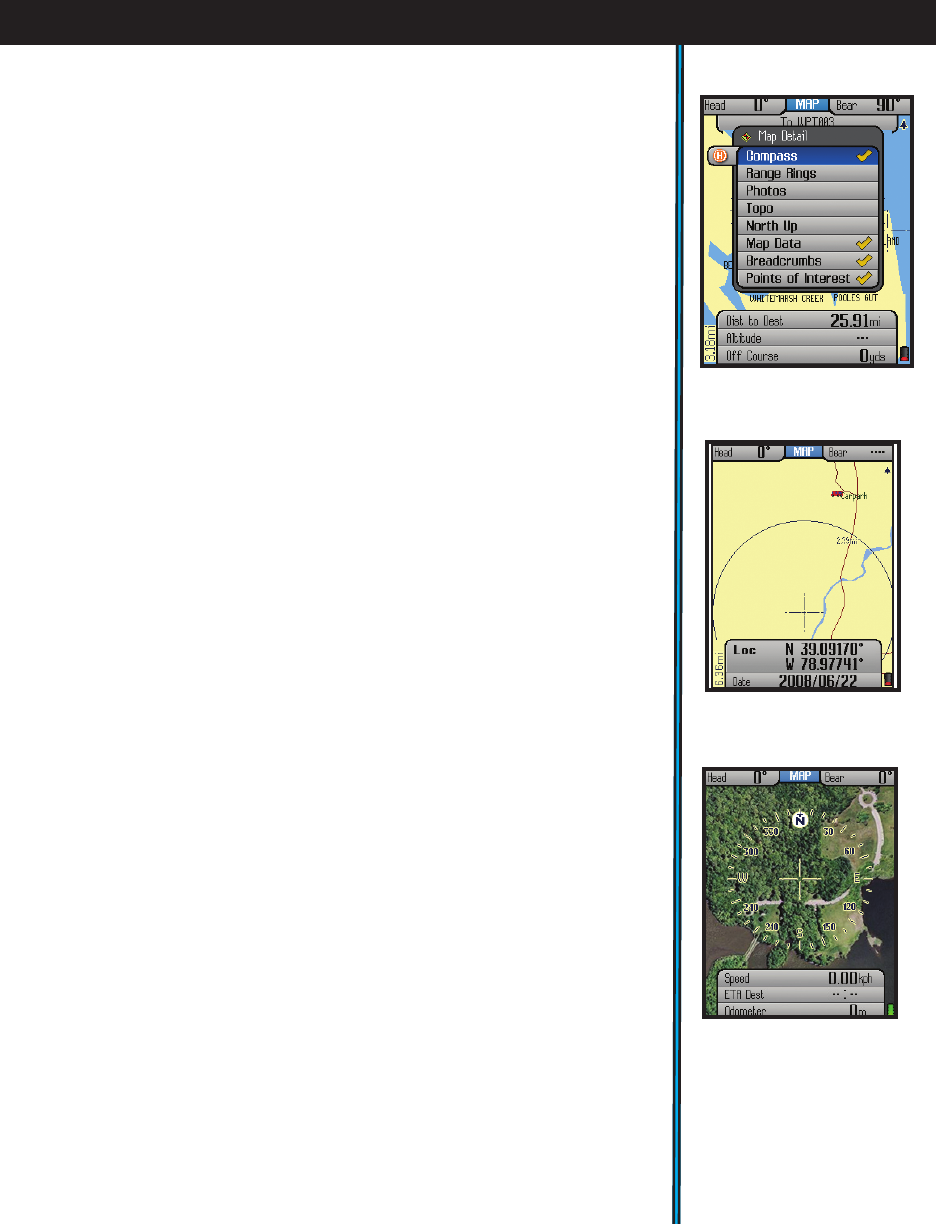
You may choose to add other items to your view of the MAP page. To select
these items, press the HOT button, then press the DOWN key until “Map
Detail” is highlighted, and press OK-you will see a map page layer options
screen (Fig. 4). Use the 5-way button to move up and down the options, press
the center button to select (check) or deselect (uncheck) the items you wish
to include in your view. Press EXIT or use the LEFT key to exit the map layer
options.
e MAP page layer options list:
•Compass-
exclusive to ONIX, your compass shows your direction right
on top of the map.
•Range Rings (Fig. 5)-visual tool that represents distance on your map or
photo within a circle. e distance shown is the radius of the circle. is
radius is half the zoom level. Use Up/Down on the 5-way pad to adjust the
radius of the rings, then press OK to exit.
• Photos (Aerial/Satellite) (Fig. 6) -superimposed over Base Map if desired.
You do not need to manually select the right photo (or topo map) to use, as
these downloaded files are “geo referenced”, enabling your ONIX to choose
the correct photo automatically, based on your current location and zoom
level. Note that while both types of images can be stored at the same time
on your ONIX, only one of them (photo or topo map) can be displayed
over the base map at a time.
•Topo-the topographic map you choose from files you download and store
in the ONIX will be layered over the base map
•North UP-when checked, the top of the screen is oriented due north. If
unchecked, the top of the screen is oriented to your current direction of
travel (i.e.“track up”-like automotive GPS units). Satellite photos and topo
maps are displayed “North Up” by default.
• Map Data-turns on/o display of roads and places on the base map
•Bread Crumbs-a dotted line on the display showing the simple path
you’ve traveled. Breadcrumbs are automatically stored, but only displayed
if this option is selected.
•Points of Interest-major or common facilities from a pre-programmed list
(airports, hospitals, etc)
Setting Up and Using the Info Boxes
(MAP & NAV Pages)
e wide rectangular Info Boxes at the bottom of the Page display (along with
two smaller boxes at the top of the screen) allows you to keep an eye at all times
on a wide variety of information, all user selectable-they let you “customize”
your display (in the MAP and NAV Pages). Take a moment to explore the Info
Boxes by following these steps:
EXPLORING THE PAGES : MAP & Info Boxes
Fig 5. MAP Page
Range Rings Layer
Fig 6. MAP Page
Satellite Photo Layer
Fig 4. MAP Page
Layer Options


