


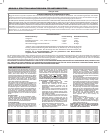

GB
3
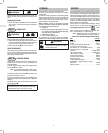
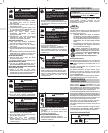
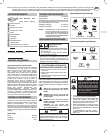
FRESH STARTE FUEL CAP
Fig. 3
Your engine may be equipped with a Fresh Start™ fuel
cap.
Contents are HARMFUL OR FATAL IF
SWALLOWED. Avoid contact to eyes, skin,
or clothing. Do not take internally. Avoid
breathing the mist or vapor. Overexposure to
eyes or skin can cause irritation. Keep
stabilizer out of the reach of children.
Fuel stabilizer is a hazardous chemical.**
** Fuel stabilizer contains 2,6-di-tert-butylphenol
(128-39-2) and aliphatic petroleum distillate
(64742-47-8).
DANGER
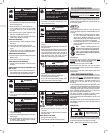
The Fresh Start fuel preserver cartridge with white tab. Ê
The Fresh Start fuel preserver cartridge with tab removed. Ë
1. Place cartridge into fuel cap. Ì
2. Push to snap" cartridge into place.Í
3. Remove the white tab to expose membrane.Î
Note: Do not remove the silver foil on opposite side of
cartridge.
4. Reinstall fuel cap on engine fuel tank.
Ï
5. Periodically check the cartridge Ï to ensure there is still
stabilizer liquid inside. If it is empty, remove cartridge
and replace.
STARTING/STOPPING
WARNING
BEFORE STARTING
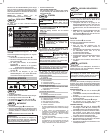
Fig. 4
• Check oil level.
• Add fuel and re-install fuel cap.
• Move throttle control to FAST position.
Ê
• Push primer bulb 3 times, if equipped. Ë
• Move choke lever to close. Ì
STARTING ENGINE
Fig. 5
• Pull back safety brake control handle Ê then,
• Pull rope handle
Ë slowly until resistance is felt. Then pull
cord rapidly to overcome compression, prevent kickback
and start engine.
• OR, Turn key to start.
Ì
CAUTION:
To prolong starter life, use short starting cycles (5 seconds
maximum, then wait one minute). Follow equipment
manufacturer’s recommendations for charging battery.
• Allow engine to warm up.
If choke equipped:
Slowly adjust toward RUN position. Wait until engine runs
smoothly before each choke adjustment.
STOPPING
Fig. 6
WARNING
Do not stop engine by moving
choke control to CHOKE.
Backfire, fire or engine dam-
age could occur.
•
Release safety brake control handle Ê OR move
throttle control to stop
Ë.
• OR, Turn key off and remove. Ì
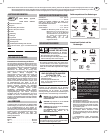
MAINTENANCE
WARNING
To prevent accidental starting, remove spark
plug wire Ê and ground it before servicing.
We recommend that you see an authorized Briggs & Stratton
Dealer for all maintenance and service. Use only Briggs &
Stratton parts.
WARNING
Do not strike the flywheel with
hammer or hard object. If
done, the flywheel may shatter during operation.
Do not tamper with governor spring, links or other parts to
increase engine speed.
CAUTION:
If engine must be tipped to transport equipment or to
inspect or remove grass, keep spark plug side of engine
up
.
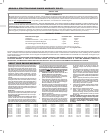
Follow the hourly or calendar intervals, whichever occur
first. More frequent service is required when operating in
adverse conditions noted below.
First 5 Hours
D Change oil
Every 8 hours or daily
D Check oil level
D Clean debris***
D Clean around muffler
Every 25 hours or every season
D Change oil if operating under heavy load or high
ambient temperature
D Service air cleaner *
Every 50 hours or every season
D Change oil
D Inspect spark arrester, if equipped
Every 100 hours or every season
D Service air cleaner cartridge, if equipped with
pre-cleaner*
D Clean air cooling system*
D Change oil filter, if equipped.
D Replace in line fuel filter, if equipped.
D Replace spark plug**
* Clean more often under dusty conditions,or when
airborne debris is present or after prolonged operation
cutting tall, dry grass.
** In some areas, local law requires using a resistor spark
plug to suppress ignition signals. If this engine was
originally equipped with resistor spark plug, use same
type of spark plug for replacement.
*** On string trimmer applications:
clean debris at each refueling, sooner if needed;
have qualified technician clean air cooling system
every 30 hours, every season, sooner if needed
especially in high debris conditions.
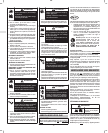
CHANGING ENGINE OIL
Fig. 7
WARNING
Change oil after first 5 hours of operation. Change oil while
engine is warm. Refill with new oil of recommended SAE
viscosity grade.
1. Preferably drian oil from top of engine as illustrated. If
draining oil from top of engine, keep air cleaner
Ë side
up. Oil can also be drained with spark plug side up.
2. OR, Oil can be drained form bottom if necessary. By
removing drain plug
Ì with a ratchet and square
extension
Í, oil can be drained from engine bottom.
OIL FILTER
Change oil filter Î, if equipped
Replace oil filter after every 100 hours of operation.
1. Drain engine oil.
2. Before installing new filter, lightly oil filter gasket with
fresh, clean oil.
3. Screw filter on by hand until gasket contacts oil filter
adapter. Tighten 1/2 to 3/4 turn more.
4. Refill engine with fresh oil.
5. Start and run engine at idle to check for leaks. Stop
engine.
6. Re-check oil level. Add oil if required.
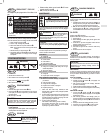
AIR CLEANER
Fig. 8
All engines have an air cleaner cartridge. The cartridge is
either flat or oval (see illustrations). In addition, some engines
have a pre-cleaner.
CAUTION:
Do not use pressurized air or solvents to clean cartridge.
Pressurized air can damage cartridge; solvents will
dissolve cartridge.
PRE-CLEANER
To clean pre-cleaner (if equipped), separate it from cartridge
and wash in liquid detergent and water. Air dry thoroughly. Do
not oil pre-cleaner. Re-assemble dry pre-cleaner on clean
cartridge.
OVAL AIR CLEANER
1. Loosen screws
Ë and lift cover Ì.
2. Carefully remove pre-cleaner
Í (if equipped) and
cartridge assembly
Î.
3. After servicing pre-cleaner and cartridge, assemble
pre-cleaner on cartridge.
4. Install cartridge/pre-cleaner assembly in base
Ï.
5. Place cover on air cleaner and tighten screws securely
to base.
SQUARE AIR CLEANER
1. Loosen screw
Ë and tilt cover Ì down. Carefully
remove pre-cleaner
Í (if equipped) and cartridge Î
assembly from cover
2. After servicing pre-cleaner and cartridge, place pre-
cleaner, if equipped, over cartridge pleats with arrows in
direction shown (pre-cleaner lip
Ï will be at bottom of
pleats).
3. Install pre-cleaner and cartridge assembly in cover.
4. Insert tabs on cover into slots
Ð in bottom of base.
5. Tilt cover up and tighten screw securely to base.