20
3541 Unit A, Lomita Boulevard, Torrance, CA 90505 (310) 325-4799
www.stoptech.com
BB
BB
B
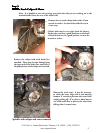
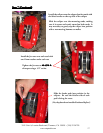
rake fluid will damage most painted surrake fluid will damage most painted sur
rake fluid will damage most painted surrake fluid will damage most painted sur
rake fluid will damage most painted sur
facesfaces
facesfaces
faces
. I. I
. I. I
. I
mmediately clean spilled brake fluid frmmediately clean spilled brake fluid fr
mmediately clean spilled brake fluid frmmediately clean spilled brake fluid fr
mmediately clean spilled brake fluid fr
omom
omom
om
any painted surany painted sur
any painted surany painted sur
any painted sur
face, including the caliperface, including the caliper
face, including the caliperface, including the caliper
face, including the caliper
. .
. .
.
Though caliper paint is designed to rThough caliper paint is designed to r
Though caliper paint is designed to rThough caliper paint is designed to r
Though caliper paint is designed to r
esist harshesist harsh
esist harshesist harsh
esist harsh
chemicals, prolonged exposure will damage the finish.chemicals, prolonged exposure will damage the finish.
chemicals, prolonged exposure will damage the finish.chemicals, prolonged exposure will damage the finish.
chemicals, prolonged exposure will damage the finish.
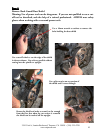
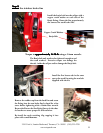
Step 9
Bleed BrakesBleed Brakes
Bleed BrakesBleed Brakes
Bleed Brakes
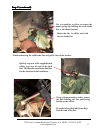
Bleed the brake system using an 11mm wrench on the bleed screws:
- The sequence for bleeding the brakes should be:
1. Right outboard bleed screw
2. Right inboard bleed screw
3. Left outboard bleed screw
4. Left inboard bleed screw
After initially bleeding the system, gently tap the caliper body with a non-marring mallet or
hammer to dislodge any small air bubbles and re-bleed.
Note: The calipers and lines will need to fill with fluid, quickly draining the master cylinder reser-
voir. Keep a close watch on the fluid level when initially bleeding the system. Do not allow the
master cylinder reservoir to run dry and draw in air. Doing so may require the brake system to be
serviced by a certified brake technician.
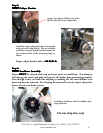
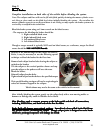
After bleeding, apply a constant pressure to the brake pedal and check all connections,After bleeding, apply a constant pressure to the brake pedal and check all connections,
After bleeding, apply a constant pressure to the brake pedal and check all connections,After bleeding, apply a constant pressure to the brake pedal and check all connections,
After bleeding, apply a constant pressure to the brake pedal and check all connections,
including bleed screws, and both ends of the line for leaks.including bleed screws, and both ends of the line for leaks.
including bleed screws, and both ends of the line for leaks.including bleed screws, and both ends of the line for leaks.
including bleed screws, and both ends of the line for leaks.
Complete installation on both sides of the vehicle before bleeding the system.
Though a torque wrench is typically NOT used on bleed screws, as a reference, torque for bleed
screws should be
100-140 INCH/P100-140 INCH/P
100-140 INCH/P100-140 INCH/P
100-140 INCH/P
oundsounds
oundsounds
ounds.
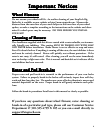
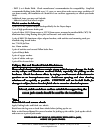
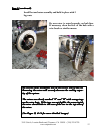
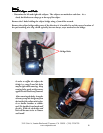
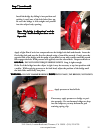
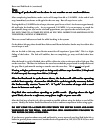
Because of the unusual angle of the caliper on some ve-
hicles, it may be necessary to use the following special
technique to bleed the brakes for the first time:
Remove both caliper bracket bolts leaving the caliper at-
tached to the bracket
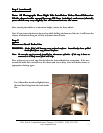
Tilt the caliper to the vertical position shown and sup-
port the caliper so the pads are still over the rotor
Bleed the brakes
Reinstall caliper bracket bolts
Tighten both caliper bracket bolts to the specified torque
This special bleeding tecnique will not be required again
unless air becomes trapped in the calipers.
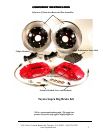
Vehicle shown may not be the same as the vehicle in this manual.