Step 7 (continued)Step 7 (continued)
Step 7 (continued)Step 7 (continued)
Step 7 (continued)
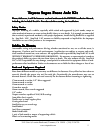
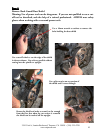
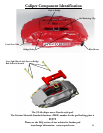
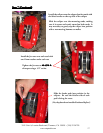
If the fit of the bridge into the caliper is tight it may be necessary to tap into position with
a mallet. While applying pressure to the bolt head, adjust the position of the bridge until
the bolt slides more freely into place.
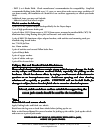
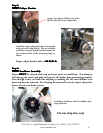
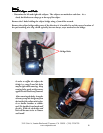
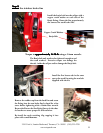
Apply a light film of anti-sieze compound onto the bridge bolt shaft and threads. Insert the
first bridge bolt and start the first few threads using a 5mm Allen wrench. Gently press the
opposite side of the bridge with the palm of your hand, or tap with a mallet until the second
bolt engages the hole. With pressure still applied, start the second bolt. Torque each bolt to
8-10 lb-ft.8-10 lb-ft.
8-10 lb-ft.8-10 lb-ft.
8-10 lb-ft. DO NOT OVER TORQUE BRIDGE BOLTS! Snug is tight enough.
Apply pressure to head of bolt
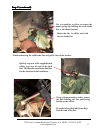
If necessary, apply pressure on bridge to posi-
tion properly. Do not hammer bridge too deep
into the caliper as you may deform the pad
retaining spring clip.
WW
WW
W
ARNING: ARNING:
ARNING: ARNING:
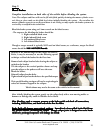
ARNING: DO NOT HAMMER BRIDGE
BOLBOL
BOLBOL
BOL
TT
TT
T
SS
SS
S INTO PLACE, TAP BRIDGE, NOT BOLTS.
3541 Unit A, Lomita Boulevard, Torrance, CA 90505 (310) 325-4799
www.stoptech.com 18
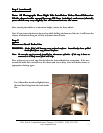
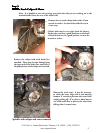
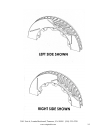
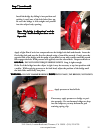
Install the bridge by sliding it into position and
rocking it until one of the bolt holes lines up.
Be sure the bridge is slid straight and parallel
into the caliper body opening.
Note: The bridge is directional and theNote: The bridge is directional and the
Note: The bridge is directional and theNote: The bridge is directional and the
Note: The bridge is directional and the
““
““
“
air-scoopair-scoop
air-scoopair-scoop
air-scoop
” detail should face do” detail should face do
” detail should face do” detail should face do
” detail should face do
wn on thewn on the
wn on thewn on the
wn on the
Supra kit.Supra kit.
Supra kit.Supra kit.
Supra kit.