BB
BB
B
e sure sur
e sure sur
e sur
e the re the r
e the re the r
e the r
otor assemblies arotor assemblies ar
otor assemblies arotor assemblies ar
otor assemblies ar
e on the corre on the corr
e on the corre on the corr
e on the corr
ect side of the carect side of the car
ect side of the carect side of the car
ect side of the car
..
..
.
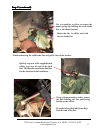
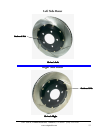
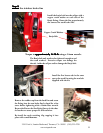
Reversing the rotors will severely decrease the cooling capac-Reversing the rotors will severely decrease the cooling capac-
Reversing the rotors will severely decrease the cooling capac-Reversing the rotors will severely decrease the cooling capac-
Reversing the rotors will severely decrease the cooling capac-
ity of the system.ity of the system.
ity of the system.ity of the system.
ity of the system.
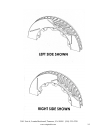
The rThe r
The rThe r
The r
otors arotors ar
otors arotors ar
otors ar
e clearly mare clearly mar
e clearly mare clearly mar
e clearly mar
ked “Lked “L
ked “Lked “L
ked “L
” and “R” and “R
” and “R” and “R
” and “R
” with or” with or
” with or” with or
” with or
ange tagsange tags
ange tagsange tags
ange tags
on the rotor hats. If the tags are not legible, the vanes insideon the rotor hats. If the tags are not legible, the vanes inside
on the rotor hats. If the tags are not legible, the vanes insideon the rotor hats. If the tags are not legible, the vanes inside
on the rotor hats. If the tags are not legible, the vanes inside
the rotor should lean to the rear of the car on the top-side ofthe rotor should lean to the rear of the car on the top-side of
the rotor should lean to the rear of the car on the top-side ofthe rotor should lean to the rear of the car on the top-side of
the rotor should lean to the rear of the car on the top-side of
the rthe r
the rthe r
the r
otorotor
otorotor
otor
..
..
.
(S(S
(S(S
(S
ee Pee P
ee Pee P
ee P
ages 13 & 14 for morages 13 & 14 for mor
ages 13 & 14 for morages 13 & 14 for mor
ages 13 & 14 for mor
e detailed images)e detailed images)
e detailed images)e detailed images)
e detailed images)
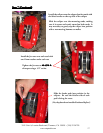
Step 6Step 6
Step 6Step 6
Step 6
(continued) (continued)
(continued) (continued)
(continued)
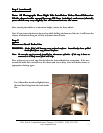
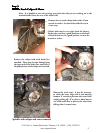
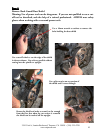
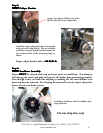
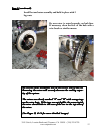
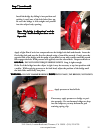
Install hat and rotor assembly and hold in place with 2
lug nuts.
3541 Unit A, Lomita Boulevard, Torrance, CA 90505 (310) 325-4799
www.stoptech.com 12
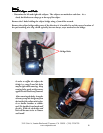
Be sure rotor is seated squarely on hub face.
If necessary, clean the face of the hub with a
wire brush or similar means.