


Parker Hannifin Corporation
Automation Actuator Division
Wadsworth, Ohio
28
Automation
PM-ER01/USA
ER Series Rodless Actuator
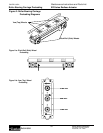
Maintenance Instructions and Parts List
Roller Bearing Carriage Preloading Procedure
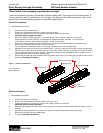
1. Inspect the carriage for excess grease or contamination. Wipe off excess with a clean cloth.
2. Inspect the wheel material for any damage. If wheel material shows excessive wear, consult the factory for a
replacement.
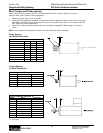
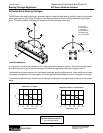
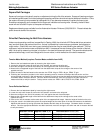
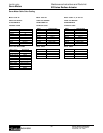
3. Pitch/Roll (Side) Wheel Adjustment (Refer to Figure 2-a on page 29)
a. Loosen the side wheel attachment plates on both side of the carriage. Do not remove the screws.
b. With the side of the carriage facing you, push the wheel on the left upward and tighten the upper right attachment
screw. Push the wheel on the right downward and tighten the lower left screw.
c. Repeat this procedure on the other side, again moving the left wheel up and the right wheel down.
d. Set the final side wheel position by moving the carriage toward the end of the extrusion, where access to the wheels is
possible. Using a flat head screw driver, move the side wheels into contact with the appropriate edge of the slot, using
the initial settings of left wheel up and right wheel down. Hold the wheel in place against the slot with the screwdriver
and tighten the accessible plate screws.
e. Remove the carriage and tighten the remaining screws.
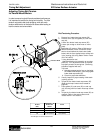
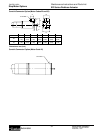
4. Yaw (Top) Wheel Adjustments (Refer to Figure 2-b on page 29)
a. Place the carriage in the body extrusion with the top slot facing you.
b. Preload the wheels. The top, or yaw wheels are adjusted via eccentric hex bushings. The wheels are brought into
contact with the extrusion slot by turning the eccentrics clockwise with a socket. When adjusting yaw wheels, be sure
that the two outer wheels contact the same side of the slot, while the center wheel contacts the opposite side.
Note: When mounting the actuator on its side, consider orienting the outer wheel downward to support the majority of the load.
c. Apply removable threadlocker just prior to adjusting. To tighten the wheel in place, tighten the mounting screw while
holding the eccentric bushing in place.
5.) Inspect the Carriage
a. Carriage Alignment
After all wheels have been preloaded, move the carriage back and forth to ensure that there are no alignment issues.
Also inspect the carriage to ensure that it is situated parallel to the body extrusion. Allowing the carriage to run poorly
aligned will cause premature wear on the bearings and on the strip guide bearings.
b. Magnitude of the Preload
When pulling the carriage out of the body, you should feel a slight bump when the carriage disengages. If the bump is
significant, consider readjusting.
Questions?
Call the Automation Actuator Division Electromechanical
Applications Department at (330) 336-3511
Roller Bearing Carriage Preloading
Important note: The tighter the contact with the wheels, the greater the effects of flat spots developing on the wheels at rest.
It is only necessary to have slightly firm contact between the wheel and the extrusion. Excessive preload reduces the life of the
bearings.