


Parker Hannifin Corporation
Automation Actuator Division
Wadsworth, OH 44281
27
Automation
ER Series Rodless Actuator
PM-ER01/USA Maintenance Instructions and Parts List
Roller Bearing Carriage Preloading
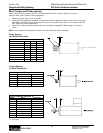
When would it be necessary to preload the carriage?
Under normal operating conditions (as specified in Parker Catalog 1894), the carriage should not lose preload. A
loss of preload can result in noticable play in the carriage in any direction. Should the carriage feel "loose" in the
actuator body, follow the following procedure to reset the carriage preload.
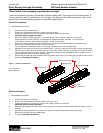
Screw Drive Actuators
1. Disassemble the actuator.
a Detach the load from the actuator.
b Remove the load attachment plate (8 socket head cap screws).
c Loosen the screws on the strip seal clamps and carefully remove the strip seal.
CAUTION: Strip seal edges are sharp!
d Detach the motor mounting assembly. For parallel driven units, it may be necessary to loosen the
timing belt before removing the four mounting bolts that attach the entire assembly. For inline driven
units, remove the motor and coupler housing (four screws for each part).
e Remove the bolts that attach the motor-side end cap (containing the thrust bearings) to the actuator body.
f Remove the mounting bolts from the non-driven end cap.
The carriage-screw assembly should now be axially somewhat loose in the actuator body.
g Separate the non-driven end cap from the actuator body. To do this, rotate the drive screw unitl the carriage lightly
meets the end of travel at the non-driven end cap. Once there, slowly rotate the drive screw; it will act as a jacking
screw to separate the end cap from the body. The screw and bearing are held together with an adhesive, and it
may require some effort to carefully separate them.
h Remove the carriage and screw assembly from the actuator body, but do not remove the carriage from the screw!
i Procede to Preloading Procedure.
Belt-Drive Actuators
1. Disassemble the actuator.
a Detach the load from the actuator.
b Remove the load attachment plate (8 socket head cap screws).
c Loosen the screws on the strip seal clamps and carefully remove the strip seal.
CAUTION: Strip seal edges are sharp!
d Detach the belt clamps from both sides of the carriage by removing the single socket head cap screws from the
carriage.
e Remove the bolts that attach the non-driven end cap to the actuator body and remove the end cap.
f Remove the carriage from the actuator body.
g Procede to Preloading Procedure.
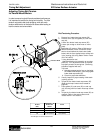
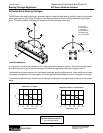
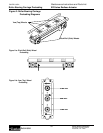
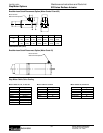
Figure 1: Actuator Components
Top: Screw Drive
Bottom: Belt Drive
Strip Seal Clamp
Strip Seal Clamp
Strip Seal Clamp
Strip Seal Clamp
Load Attachment Plates
Belt Clamp
Belt Clamp Screw