


9
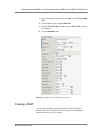
Creating the RPC pool
The next pool is for RPC traffic.
1. On the Main tab, expand Local Traffic, and then click Pools.
The Pool screen opens.
2. In the upper right portion of the screen, click the Create button.
The New Pool screen opens.
3. From the Configuration list, select Advanced.
The advanced configuration options appear.
4. In the Name box, enter a name for your pool.
In our example, we use rpc_pool.
5. In the Health Monitors section, from the Available list, select tcp
and click the Add (<<) button.
6. From the Allow SNAT and Allow NAT lists, select No to disallow
NAT and SNAT.
7. The other fields in the Configuration section are optional. Configure
these fields as applicable for your network. (For additional
information about configuring a pool, click the Help button.)
8. In the Resources section, from the Load Balancing Method list,
choose your preferred load balancing method (different load
balancing methods may yield optimal results for a particular
network).
For this configuration, we recommend selecting Least Connections.
In Least Connections mode, the BIG-IP LTM system passes a new
connection to the node that has the least number of current
connections. Least Connections mode works best in environments
where the servers or other equipment you are load balancing have
similar capabilities. Using Live Communications Server, traffic
from servers to clients is roughly the same on each connection.
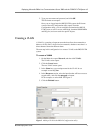
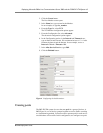
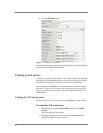
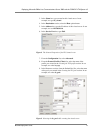
9. In the New Members section, you add the Live Communications
Servers to the pool.
a) In the Address box, type the IP address of the Live
Communications Server.
In our example, we type 10.10.10.11.
b) In the Service Port box, type the service number you want to use
for this device, or specify a service by choosing a service name
from the list (for example 135). In our example, we type 135, the
port for RPC.
c) Click the Add button to add the member to the list.
d) Repeat steps a-c for each Live Communications Server you want
to add to the pool. In our example, we repeat these steps twice for
the other two Live Communications Servers (10.10.10.12 and
10.10.10.13). See Figure 6.
10. Click the Finished button.