


13
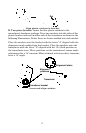
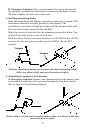
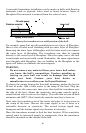
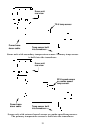
Both bracket types: Attach the transducer to the transom. Slide the
transducer up or down until it's aligned properly with the bottom of
the hull as shown in the preceding and following figures. Tighten the
bracket's mounting screws, sealing them with the caulking compound.
Adjust the transducer so that it's parallel to the ground and tighten
the nut until it touches the outer washer, then add 1/4 turn. Don't
over tighten the lock nut! If you do, the transducer won't kick-up if it
strikes an object in the water.
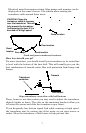
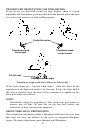
Align transducer centerline with hull bottom and attach transducer to
transom. Rear view of dual frequency Skimmer shown.
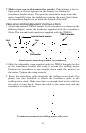
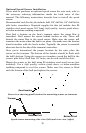
6. Route the transducer cable through or over the transom to the sonar
unit. Make sure to leave some slack in the cable at the transducer. If
possible, route the transducer cable away from other wiring on the
boat. Electrical noise from the engine's wiring, bilge pumps, VHF radio
wires and cables, and aerators can be picked up by the sonar. Use
caution when routing the transducer cable around these wires.
WARNING:
Clamp the transducer cable to the transom close to the
transducer. This can prevent the transducer from
entering the boat if it is knocked off at high speed.
If you need to drill a hole in the transom to pass the connector through,
the required hole size will be 5/8".
Caution:
If you drill a hole in the transom for the cable, make sure it is
located above the waterline. After installation, be sure to seal the
hole with the same marine grade above- or below-waterline
sealant used for the mounting screws.
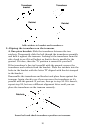
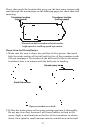
Flat-bottom hull
Deep-"vee" hull
Bottom
of
hull