


6
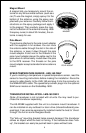
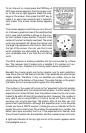
Magnet Mount
A magnet lets you temporarily mount the an-
tenna on any ferrous metal surface. (such as a
car) To use the magnet, simply epoxy it to the
bottom of the antenna, using the epoxy sup-
plied with your antenna. Carefully follow the in-
structions on the epoxy package and apply it
to the magnet. Then carefully press the mag-
net to the bottom of the antenna housing. After
the epoxy cures (in about 30 minutes), the an-
tenna is ready for use.
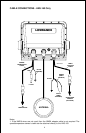
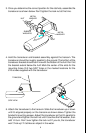
Pole Mount
The antenna attaches to the pole mount adapter
with the supplied 4 mm screws. You can route
the antenna cable through the slot in the side of
the antenna, or pass it down through the pole
mount adapter. A slot next to the threads in the
pole mount adapter places the cable next to the
pole where it can be easily routed down the pole
to the GPS receiver. The threads on the pole
mount adapter accept a standard marine antenna
mount.
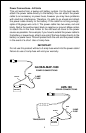
MAGNET
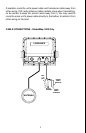
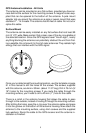
SPEED/TEMPERATURE SENSOR - LMS-160 ONLY
If you’re installing a temperature or speed/temperature sensor, read the
sensor’s mounting instructions before making the installation. Route the
sensor’s cable directly to the LMS-160 and plug it into the connector on
the NMEA/DGPS cable. The speed/temp sensor plugs into the optional
SAM sonar module on the GlobalMap 1600.
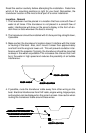
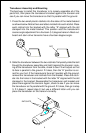
TRANSDUCER INSTALLATION - LMS-160 ONLY
(Note: A transducer is not included with all units. You may need to pur-
chase the transducer separately.)
The HS-WSBK supplied with this unit is a transom mount transducer. It
can be installed on any outboard or stern-drive (inboard\outboard) pow-
ered boat. It can also be permanently installed inside the boat to “shoot-
through” the hull on some fiberglass boats.
The “kick-up” mounting bracket helps prevent damage if the transducer
strikes an object while the boat is moving. If the transducer does “kick-
up”, the bracket can easily be pushed back in place without tools.
POLE MOUNT