


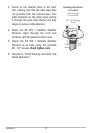
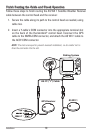

2. Confirm that the cable length is adequate and route the cable from
the receiver to the Humminbird® control head. If holes are required to
route the cable, they must be 3/4” (19 mm) to allow for the cable
connector.
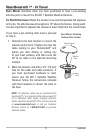
3. The AS WX 1 Satellite Weather Receiver has two wire routing notches.
Use the cable notch closest to the intended cable route.
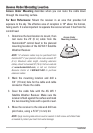
4. With the cable routed, position the AS WX 1 Satellite Weather Receiver
in the planned mounting location and mark the mounting holes with a
pencil or awl.
5. Move the AS WX 1 Satellite Weather Receiver to the side and drill the
two 5/32” (4 mm) pilot holes.
NOTE: Apply marine-grade silicone caulk or sealant to both screw and drilled
holes as needed to protect your boat from water damage.
6. Align the screw holes of the AS WX 1 Satellite Weather Receiver over
the pilot screw holes, and attach with the #6 - 3/4 Phillips head
screws. Hand tighten only.
7. Proceed to “Finish Routing the Cable and Check Operation.”
9
Installation