


6 Introduction to Your Navigation System
NavMate Navigation System
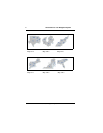
• Reverse sensor circuit signals when the vehicle is backing up.
• A 3 amp fuse protects the navigation system from system fluctuations.
• A video display cable connects the computer to the display unit, and an
antenna wire connects the GPS antenna to the system.
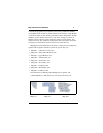
Portable NavMate Navigation System
System Components
• Navigation System Computer – includes removable CD featuring digital
map and information database, and navigation application software to
operate the system.
• Display Cable – connects navigation computer to the display unit.
• GPS Antenna – installed on the roof, this antenna must have a clear view of
the sky to receive the GPS satellite signals.
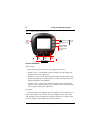
• Display Unit – typically mounted on or near the instrument panel, this
features a color LCD display screen, built-in speaker, and control buttons.
• NavMate Bag and Battery Module – contains a foam insert to provide
protection to NavMate components contained in the bag. This uniquely
designed bag has an upper tray for stowing away the display unit and
display cable. In addition, battery pack and module are mounted under the
tray. Both tray and bag have air vents to allow for proper airflow.
• Display Mount – Typically mounted on or near the instrument panel of the
vehicle. For mounting instructions and care please carefully read Installation
Manual included with this kit.
• Wall Charger – used to charge batteries in the NavMate bag through a 110V
AC outlet. Please charge the batteries once a month for 14 hours or when
red bulb on top of the tray illuminates. For more information on care and
handling of the battery pack please read the Installation Manual included
with this kit.
• Map CD – One Map CD is included with this kit. To order additional and
updated Map CDs please call 1-86NAVMATE1 (1-866-286-2831) or visit
www.horizonnav.com.