


46
To save and use a Track Log:
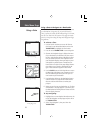
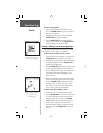
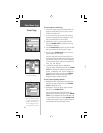
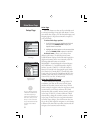
1. Access the ‘Tracks’ page from the Main Menu. The
page has On/Off buttons, a list of tracks, and the
number of unused tracks.
2. You can press IN on the on-screen ‘Off’ button to
pause track logging. When track logging is active
the ‘On’ button appears to be recessed.
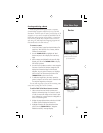
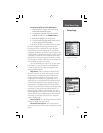
3. Highlight the ‘Save’ on-screen button and then
press the THUMB STICK to display the track log
‘Save Back Through’ list.
4. Use the THUMB STICK to select the time and date
that you would like to save the track through.
5. Press IN on the THUMB STICK to save the track
log and display the Track Page.
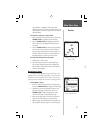
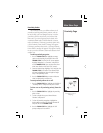
The Track Page shows the track name (which can
be renamed using the keyboard for data entry), the
total distance of the track, track area (if available),
a ‘Show on Map’ option, and on-screen buttons for
‘Map’, ‘OK’, and ‘Tracback’.
6. To enable the Tracback feature, highlight the
‘Tracback’ button and then press IN on the THUMB
STICK. This displays the Tracback Menu with two
options, ‘To Beginning’ and ‘To End’. Highlight the
desired option and then press IN on the THUMB
STICK to enable. Access the Map Page or the
Navigation Page to navigate the Track.
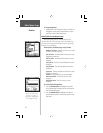
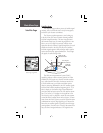
To use Track Log Setup options:
1. Highlight the Tracks Page Options Menu button at
the top of the page and press IN on the THUMB
STICK to display the menu.
2. Highlight the ‘Tracks Log Setup’ option and then
press IN on the THUMB STICK.
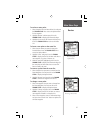
You can check the ‘Wrap When Full’ option by
highlighting it and then pressing IN on the THUMB
STICK. You can highlight the ‘Record Method’ and
‘Interval’ fields and press IN on the THUMB STICK
to display their options. ‘Interval’ options change to
accommodate the ‘Record Method’ choices.
Track Log Setup Menu
Save Track Options
Saved Track Page
If you choose Auto-record, you
can set the recording interval
from More to Least Often. You
can set recording intervals for
Time or Distance as desired.
Main Menu Page
Tracks Page