


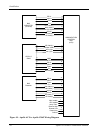
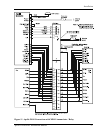
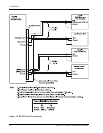


Installation
28 Apollo GX50/60/65 Installation Manual
3. Check the signal reception using the GPS sensor displays in the System mode. Press the
SYS button, rotate the LARGE knob to the “GPS SENSOR:” page, and press ENT. Then
rotate the SMALL knob to display the GPS info. Typical signal levels are 50 or better.
4. Turn on other avionics one at a time and check the GPS signal reception to make sure it
is not affected.
5. Check for VHF comm transmitter interference. This must be completed on all IFR
installations.
a) Verify that 5 to 8 satellites are in DATA and the NAV flag is out of view.
b) Tune the comm to 121.150 MHz and transmit for 20 seconds.
c) Verify that the position is not lost.
d) Repeat for additional frequencies as follows.
121.125 MHz 131.225 MHz
121.175 MHz 131.250 MHz
121.200 MHz 131.275 MHz
121.225 MHz 131.300 MHz
121.250 MHz 131.325 MHz
131.200 MHz 131.350 MHz
e) Repeat for each comm transmitter.
f) If the GX50/60/65 is susceptible to VHF comm transmitter interference, then better
isolation, or distance, may be required between the GPS and VHF antennas. With
some comm transmitters, a notch filter may be required in series with the VHF
comm antenna coax at the rear of the comm unit.
Note: Older VHF comm transmitters may emit higher levels of harmonic interference
causing greater problems and may be more difficult to deal with.
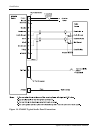
VHF COMM CHECKOUT (GX60/65)
Receiver / Transmitter Operation
Tune the unit to a local frequency and verify the receiver output produces a clear and
understandable audio output. Verify the transmitter functions properly by contacting another
station and getting a report of reliable communications. Check the remote flip/flop.
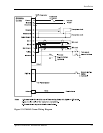
Antenna Check
The antenna VSWR can be checked using an inline wattmeter in the antenna coax using
frequencies near both ends of the band. The VSWR should be < 2:1, and is not to exceed 3:1.
A VSWR of 2:1 will cause a drop in output power of approximately 12%, and 3:1 causes
approximately a 26% drop.
Sidetone Level Adjustment
The sidetone volume was preset at the factory to a typical audio level. The level can be
adjusted using one of the built-in system functions. To adjust the sidetone level:
1. Press SYS, rotate the LARGE knob to the “COM INFO” page, and press ENT.
2. Rotate the LARGE knob to the “SIDETONE LEVEL” page.
3. Press SEL, rotate the SMALL knob to adjust the sidetone level, then press ENT when
complete. The sidetone level is displayed in a range of 000 to 255, with 255 the highest
level. The sidetone level can be adjusted during transmit.