


Installation
12 Apollo GX50/60/65 Installation Manual
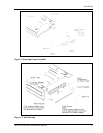
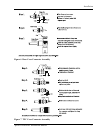
UNIT INSERTION
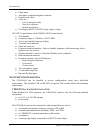
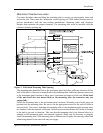
Position the cam lock as shown below. The front lobe of the cam should be vertical. The cam
lock mechanism should be fully unscrewed (turned counter-clockwise). Slide the unit into the
frame. Turn (clockwise) and carefully hand-tighten (4 in-lb max.) the cam lock mechanism
using only the 3/32" hex driver provided in the installation package. Using a larger tool than
the one provided makes it easy to exceed the allowable torque on the cam lock resulting in
damage to the unit. The unit will be pulled into the frame securing the unit and the connectors
will fully engage. Do NOT overtighten. The back of the bezel must only be flush to the
mounting tube. If the cam lock is hard to turn or the unit does not seat fully, the unit is
probably binding and the mounting tube should be checked.
UNIT REMOVAL
To remove the unit from the mounting frame, turn the screw counter-clockwise with the hex
driver to unscrew the cam lock mechanism. The unit will begin to pull away from the
mounting tube. Turn the screw until slight resistance is felt and then pull the unit from the
frame. Do not exert excessive turning force at the end of the cam lock travel or the unit
may be damaged. With the cam lock fully disengaged, pull the unit straight out holding onto
the sides of the bezel. It is not recommended that you pull the unit out by the rotary knobs. No
special extraction tools are required, if the mounting tube is properly installed.