Bettis P/N 124840E
Revision “B”
Page 31 of 46
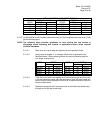
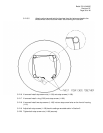
4.9.2.2 Install o-ring seal (6–30) onto outboard end of ES (7-40) and up against outboard
side of adapter plate (7-10).
4.9.2.3 Install stop screw nut (7-50) onto outboard end of ES (7-40).
4.9.3 Install the assembled ES adapter plate (7-10) onto the spring cartridge out end per Section
5.2 steps 5.2.11 through 5.2.15.
SECTION 5 - MODULE REMOVAL AND INSTALLATION
NOTE: When the Spring Module is to be removed it should be removed from the drive Module prior to the
Pneumatic Power Module removal or disassembly.
WARNING: DO NOT REMOVE SPRING MODULE WHILE SPRING IS COMPRESSED
WARNING: ACTUATORS EQUIPPED WITH A SPRING CARTRIDGE MOUNTED M3 JACKSCREW
OR AN EXTENDED STOP (ES) READ WARNING TAG WIRED TO THE SPRING
CARTRIDGE COVER PLATE
5.1 SPRING MODULE REMOVAL
WARNING: DO NOT REMOVE SPRING MODULE WHILE SPRING IS COMPRESSED
NOTE: Review section 2.1 General Disassembly before proceeding with Spring Module
Disassembly.
NOTE: The setting of stop screws (1-180) should be checked and setting recorded before stop
screws are loosened or removed.
NOTE: G2-SRF and G3-SRF use step 5.1.1. G01-SR, G2-SR, G3-SR through G13 skip step
5.1.1 and start at step 5.1.2.
5.1.1 G2-SRF and G3-SRF unscrew and remove pipe plug (7-10) from spring cartridge
assembly (5-10). Skip steps 5.1.2, 5.1.3 and start at step 5.1.4.
WARNING: If an M3, M3HW jackscrew or extended stop (ES) is mounted in the spring
module cover plate (7-10), the M3, M3HW or ES should not contact the end of
the spring module tension rod.
5.1.2 Unscrew hex cap screws (7-20) with lockwashers (7-30) from cover plate (7-10) or if spring
module has a M3-SR adapter plate (7-10) or a SR-ES adapter plate remove safety wire
from hex cap screws (7-20) and then remove hex cap screws (7-20).


