


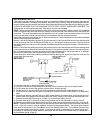


REMOTE START SELECTABLE FEATURES
RF Programmable Features:
LED Pattern
1 x Pause etc.
2 x Pause etc.
3 x Pause etc.
4 x Pause etc.
5 x Paues etc.
6 x Pause etc.
7 x Pause etc.
8 x Pause etc.
Default
Off
10 Minutes
Steady
Tach
----------------
Off during crank
Off
---------------
Park Lights Flashes 2 x
RF start chirp confirm on
15 minute run time
Parking lights flash
Tach operation
(No function)
Ignition 2 on during crank
Diagnostics on
(No function)
Park Lights Flash 1 x
RF start chirp confirm off
10 minute run time
Parking lights on steady
(No function)
(No function)
Ignition 2 off during crank
Diagnostics off
(No function)
Feature Selection
First
Second
Third
Fourth
Fifth
Sixth
Seventh
Eighth
To Program The Remote Start Selectable Features:
1. Start with the valet/program switch in the "Off" position.
2. Turn the ignition key to the On position.
3. Flip the valet/program switch On, Off, On, Off, On, then Off.
4. Immediately turn the ignition key Off then press transmitter button 2 for 1 second.
5. Immediately turn the ignition key back On.
6. Flip the valet/program switch On, Off, On, then Off. The siren will emit 2 short and 1 long chirp verifying
you are in the feature program mode.
7. Use button 1 on the transmitter to advance to the feature you want to change. EXAMPLE- If you need to
change selectable feature 3, press and release button 1 on the transmitter 3 times in succession. The
parking lights will flash, and the siren will chirp 3 times confirming that selected feature 3 can be changed.
8. Use button 2 on the transmitter to change the selection of the programmable feature. If you are not sure
what the setting for any feature is, press button 2 one time, the parking lights will flash once or twice
indicating the features setting.
NOTE: Once you've entered the program mode DO NOT allow more than 15 seconds to pass between
steps, or the programming mode will be terminated.
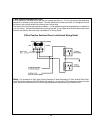
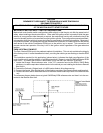
Programming Tach Rate:
The APS-750 will learn the tach rate of the vehicle. To learn tach.
1. Start with the programming switch in the Off position.
2. Turn the ignition key to the On position.
3. Flip the valet/program switch On, Off, On, Off, On, then Off.
4. Immediately turn the ignition key Off.
5. Flip the valet/program switch On, then start the vehicle using the key.
6. When the unit senses the tach signal, the parking lights will begin to flash.
7. Flip the valet/program switch Off, The parking lights will turn on for three seconds to indicate that the
learned tach signal is stored and the unit is out of the tach learn mode.
NOTE: If the unit fails to learn tach rate due to an improper tachometer connection or a poor tach source, the
unit will go into a fail-safe mode. While in this mode, the remote start transmitter will not function and the
program switch will stop responding. This will be indicated by the LED turning on and off with each operation
of the program switch. To correct this situation, locate and connect the Green/Orange wire to the proper
tach signal, disconnect the power wire to the control module, repower the circuit, re-enter and learn the
proper tach signal.
Diagnostics:
Enter selectable feature #7 and turn on as described above.
NOTE: Diagnostic mode is a temporary mode. Once you have accessed the diagnostic mode, the unit will
pause for two seconds then begin to flash the last stored shut down code. This code will be displayed three
times in succession, then the unit will automatically exit the diagnostic on mode.
The parking lights will flash a number of times indicating the reason for the last remote start shutdown. The
light flash indications are as follows:
1 Flash 10 or 15 minute run timer expired
2 Flashes Low or no tach signal (RPM)
3 Flashes Positive or negative inhibit wire activation
4 Flashes Control switch moved to the off position
5 Flashes RF shutdown, Remote signal received
6 Flashes High tach signal (RPM)
16