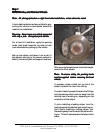
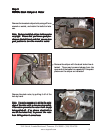
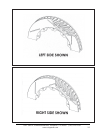
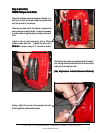
Remove the two bolts holding the caliper bridge
in place, using a 5mm Allen wrench.
Remove the caliper bridge, taking note of the di-
rection in which it is installed, and the correct
location of the pad-retaining wire clip, which
typically, but not always, remains attached to the
bridge.
Bridge Bolts
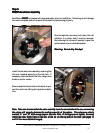
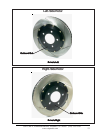
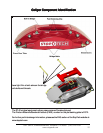
Determine the left- and right-hand side calipers. They are clearly marked on the box, but as a check,
the bleed screws are always positioned at the top of the caliper. If installing a four-wheel kit, with ST-
40 calipers on the front and rear of the vehicle, be sure that the correct caliper is on each corner. The
calipers with the smaller piston sizes go on the rear of the vehicle.
SS
SS
S
tep 6tep 6
tep 6tep 6
tep 6
II
II
I
nstall Cnstall C
nstall Cnstall C
nstall C
aliper and Paliper and P
aliper and Paliper and P
aliper and P
adsads
adsads
ads
3541 Unit A, Lomita Boulevard, Torrance, CA 90505 (310) 325-4799
www.stoptech.com 16
NN
NN
N
ote: The images in this section may not be of the vote: The images in this section may not be of the v
ote: The images in this section may not be of the vote: The images in this section may not be of the v
ote: The images in this section may not be of the v
ehicle noted, but theehicle noted, but the
ehicle noted, but theehicle noted, but the
ehicle noted, but the
y givy giv
y givy giv
y giv
e a pre a pr
e a pre a pr
e a pr
operoper
operoper
oper
representation of the correct installation.representation of the correct installation.
representation of the correct installation.representation of the correct installation.
representation of the correct installation.
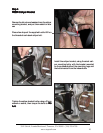
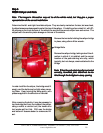
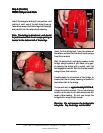
In order to stiffen the caliper, the bridge must fit
snugly, and the bolts may be tight when remov-
ing them. Keep turning the bolts gently, with
pressure applied in the direction of removal.
After removing the bolts, it may be necessary to
tap the bridge out from the inside of the caliper,
using a mallet or similar tool (the handle of a
tool works well for this). With use, the bridge
and bolts will become easier to remove and in-
sert.
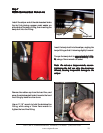
NN
NN
N
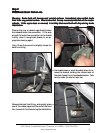
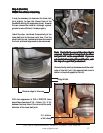
ote: When the pad-rote: When the pad-r
ote: When the pad-rote: When the pad-r
ote: When the pad-r
etaining clip is orientedetaining clip is oriented
etaining clip is orientedetaining clip is oriented
etaining clip is oriented
correctly, its welded joint should not be vis-correctly, its welded joint should not be vis-
correctly, its welded joint should not be vis-correctly, its welded joint should not be vis-
correctly, its welded joint should not be vis-
ible thrible thr
ible thrible thr
ible thr
ough the bridgeough the bridge
ough the bridgeough the bridge
ough the bridge
’’
’’
’
s air-scoop opening.s air-scoop opening.
s air-scoop opening.s air-scoop opening.
s air-scoop opening.