SS
SS
S
tep 5tep 5
tep 5tep 5
tep 5
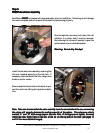
Install AeroRotor AssemblyInstall AeroRotor Assembly
Install AeroRotor AssemblyInstall AeroRotor Assembly
Install AeroRotor Assembly
AeroRotors
MUST MUST
MUST MUST
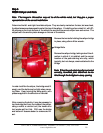
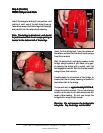
MUST be cleaned with soap and water prior to installation. Not doing so will damage
the rotors and pads, and will prevent the brakes from performing properly.
WW
WW
W
arar
arar
ar
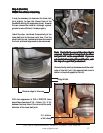
ning: Dning: D
ning: Dning: D
ning: D
o not skip this step!o not skip this step!
o not skip this step!o not skip this step!
o not skip this step!
Even though the rotors may look clean, the rust
inhibitor is in place, and it must be removed.
Not cleaning the rotors will severely impact the
performance of your new brake system.
3541 Unit A, Lomita Boulevard, Torrance, CA 90505 (310) 325-4799
www.stoptech.com 11
NN
NN
N
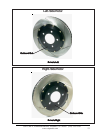
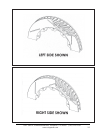
ote: Tote: T
ote: Tote: T
ote: T
ake carake car
ake carake car
ake car
e to ensure to ensur
e to ensure to ensur
e to ensur
e that the re that the r
e that the re that the r
e that the r
otor assembly is on the corrotor assembly is on the corr
otor assembly is on the corrotor assembly is on the corr
otor assembly is on the corr
ect side of the carect side of the car
ect side of the carect side of the car
ect side of the car
, as r, as r
, as r, as r
, as r
evev
evev
ev
ersingersing
ersingersing
ersing
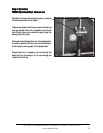
the rotors will severely decrease the cooling capacity of the system. The rotors are clearlythe rotors will severely decrease the cooling capacity of the system. The rotors are clearly
the rotors will severely decrease the cooling capacity of the system. The rotors are clearlythe rotors will severely decrease the cooling capacity of the system. The rotors are clearly
the rotors will severely decrease the cooling capacity of the system. The rotors are clearly
marmar
marmar
mar
ked “Lked “L
ked “Lked “L
ked “L
” and “R” and “R
” and “R” and “R
” and “R
” with or” with or
” with or” with or
” with or
ange tags on the range tags on the r
ange tags on the range tags on the r
ange tags on the r
otor hats. If the tags arotor hats. If the tags ar
otor hats. If the tags arotor hats. If the tags ar
otor hats. If the tags ar
e not legible, the ve not legible, the v
e not legible, the ve not legible, the v
e not legible, the v
anesanes
anesanes
anes
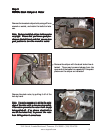
inside the rotor should lean to the rear of the car on the top side of the rotor (see pages 13inside the rotor should lean to the rear of the car on the top side of the rotor (see pages 13
inside the rotor should lean to the rear of the car on the top side of the rotor (see pages 13inside the rotor should lean to the rear of the car on the top side of the rotor (see pages 13
inside the rotor should lean to the rear of the car on the top side of the rotor (see pages 13
and 14 for more-detailed images).and 14 for more-detailed images).
and 14 for more-detailed images).and 14 for more-detailed images).
and 14 for more-detailed images).
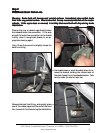
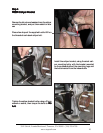
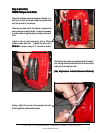
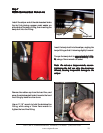
Install the hat and rotor assembly, ensuring that
the rotor is seated squarely on the hub face. If
necessary, clean the face of the hub, using a wire
brush or similar means.
Place a couple of wheel nuts on the studs, to pre-
vent the rotor from falling during brake installa-
tion.