


19
Using NVX-P1 Desktop
You can install NVX-P1 Desktop on your
computer to manage maps and custom POIs,
obtain software updates.
Installing and running NVX-
P1 Desktop
1 Insert the NVX-P1 Application CD into
your computer and follow the prompts
to install the application.
NVX-P1 Desktop runs.
Thereafter, access from the start menu.
Creating custom POIs
— POI Editor
You can create custom POIs using the POI Editor
in 2 ways.
–Create your own POI files.
–Use compatible POI files downloaded from the
Internet.
You can save up to 25 custom POI files on the
unit.
Creating a custom POI file
1 Select “Map” menu on the NVX-P1
Desktop c “Points of Interest” c “File”
c “New Text File.”
2 Enter the file name within 8 characters
in the “File Name” field, then click
“OK.”
3 Select “Edit” menu on the “POI Editor”
window c “New.”
4 Enter a description of the POI, latitude
and longitude on the “Degrees,
Minutes, Seconds” tab, then click
“OK” to save the POI.
Repeat step 2 to 4 to continue adding POIs.
5 Select “File” menu on the “POI Editor”
window, and click “OK” to save the
POI file.
Tip
To edit the name of created custom POI file, follow
step 1 and 2 above.
Importing a custom POI file
1 Download a POI file from the Internet
and save it on your computer.
2 Select “Map” menu on the NVX-P1
Desktop c “Points of Interest” c “File”
c “Open Text File.”
3 Select the POI file from your local or
network drive, then click “OK.”
Saving custom POI files to the unit
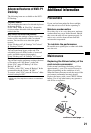
1 Connect the unit to your computer
with the USB cable, and run NVX-P1
Desktop.
2 Select “Map” menu on the NVX-P1
Desktop c “Points of Interest” c “File”
c “Save to device.”
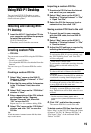
3 Adjust the POI settings as required by
selecting the following items.
* The file must be a bitmap graphic with a
minimum of 6 × 6 pixels and maximum of 32 × 32
pixels.
4 Click “OK” and follow the prompts.
The custom POI file is saved to the unit.
To delete custom POI files from the unit
Select “Map” on the NVX-P1 Desktop c “Points
of Interest” c “File” c “Manage POI files” c
“File Name”/“Size” of the unwanted POI c
“Delete” c “OK.”
“Active”
To activate the POI. If it is not selected, only
the “POI Visibility Level” and “Icon File”
will be configured.
“Visual Alert”/“Audio Alert”
To activate the visual/audio warning when the
POI is within a selected radius of your
location.
“Metric”/“Imperial”
To choose the unit of distance for the POI.
“Distance”
To set the distance from the POI at which the
visual/audio warning should display/sound.
“POI Visibility Level”
To indicate the priority of the POI when one
or more POIs are in the same area.
“Icon File”*
To display a custom POI type icon on the
map. Default icon will be used when it is not
selected.