


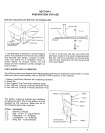
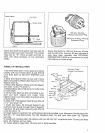

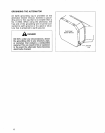


Strap Bracket
Fuel Tanl<
/
,i, Rubber Strap
Check that both the 5 gallon fuel tank and its
rubber strap have been received. The rubber
strap has an "S" -Hook at each end that in-
serts into strap brackets on the alternator
cradle°
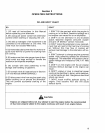
120 Volt, 30 Amp,
4-Prong Connector Plug
240 Volt, 20 Amp, 4-Prong
Connector Plug
!
Check that both the 120 Volt, 3-prong, 30 amp
and the 240 Volt, 4-prong, 20 amp connector
plug have been received. See OPTIONAL
CONNECTOR PLUGS in this section for more
information on these plugs.
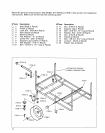
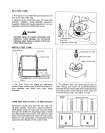
WHEEL KIT INSTALLATION
1. Set Axle Shaft (Item 1) into place and retain
loosely with two U-bolts (Item 2) and 5/16-18
Lock Nuts (item 3). DO NOT TIGHTEN Lock
Nuts.
2. Slide Axle Spacer (Item 4) over end of Axle
Shaft, followed by Wheel (item 5) and 3/4" Fiat
Washer (Item 6).
3_ Retain Flat Washer, Wheel and Axle Spacer
with 3/32" Cotter Pin (Item 7).
4. Repeat Steps (2) and (3) above for other side
of Axle Shaft.
5. Center Axle Shaft so that no binding is evi-
dent and both wheels turn freely. Then
tighten U-bolt Lock Nuts (Item 3) at both ends
of Axle Shaft.
6o Slide 7116" Fiat Washer (Item 9) over 5116-18
x ! 1/4" bolt (Item t0)o
7_ Insert bolt (Item 10) through Support Leg
Cushion (Item 8) and through hole in Support
Leg (Item 12) and retain securely with 5116-i8
Lock Nut (Item 11).
Alternator Cradle
(Viewed From Bottom)
._Item 19 /
_'-_em 16
"_'3 f Item t 3
te 11 __ Item3
Item 12 ._j_ it_--em__
Item 10 'I" ( !t _Xitem 4 [,.1" item 2
Item 7 _m_j item 5
8o Install Support Leg (Item 12), withCushion (Item 8) installed, onto Alternator Cradle using two
5/16-18 x 3/4" long Bolts (Item 13), Flat Washers (Item 14), and Lock Nuts (Item 15). Tighten
securely.
9. install both Handles (Item 16)o Retain with four 3/8-16 x 23/4'' long Bolts (Item 17) and Lock Nuts
(Item 18). Tighten all four bolts.
10. Install plastic Caps (Item 19) onto end of both Handles.
7