


C4659M (4/10) 43
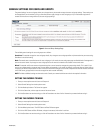
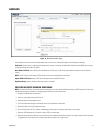
CONFIGURING A BEHAVIOR
1. Place your mouse pointer over the Events tab.
2. Select Analytic Configuration from the drop-down menu.
3. Select a profile from the Select Profile section.
4. Select the behavior for the profile from the “Select behaviors” section.
5. Check the Activate Behavior box located in the “Settings for [behavior name]” section.
If the encoder has enough resources, the behavior activates and a check mark appears to the left of the selected behavior(s), which is
located in the “Select behaviors” section.
If the encoder does not have enough resources, the following message and instructions appear: “The encoder does not have enough
processing power to activate this behavior. To free up needed resources, turn off one of the other behaviors or reconfigure the video
streams.”
6. Set up the zones for the behavior.
7. Click the Save button to save the settings, or click the Reset button to clear all of the information you entered without saving it.
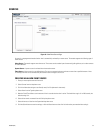
DRAWING A ZONE
You can define up to 32 zones for each behavior. Each zone has a shape and direction. There are three types of drawing tools: Box, Polygon, and
Line. If a box or polygon is drawn to define the zone, any motion against the alarmed direction will trigger an alarm. If a line (trip wire) is drawn
to define the zone, any motion that crosses the line against the alarmed direction will trigger an alarm.
1. Place your mouse pointer over the Events tab.
2. Select Analytic Configuration from the drop-down menu.
3. Click a behavior located in the “Select behaviors” section.
4. Check the Activate Behavior box located in the “Settings for [behavior name]” section. A check mark appears to the left of the selected
behavior(s) located in the “Select behaviors” section.
5. Use the draw tools to define the zone.
6. Set the behavior-specific settings for the zone:
Name: Enter a descriptive name for the zone. Consider naming zones based on their location.
Enable alarm: Activates the alarm function. Select the check box to activate an alarm.
Direction: If the alarm is enabled, this setting defines the direction in which you want to detect and count moving objects and people
inside the defined zone. Direction settings include all directions (All, Up, Up-right, Right, Down-right, Down, Down-left, Left, and Up-left).
Alarm at: Defines the number of objects required to enter the zone or cross the trip wire to trigger an alarm.
Alarm severity: Defines the level of an alarm event. Settings include Minor, Normal, Major, and Critical
Dwell Time: Defines the time in seconds that the alarm-triggered zone turns to normal status. The default setting is 30 seconds.
Reset count after alarm: Rests the counter to zero after the count reaches the defined the number of objects required to trigger an alarm.
7. To draw another zone, repeat steps 5 and 6.
8. Click the Save button to save the settings, or click the Reset button to clear all of the information you entered without saving it.