


42 C4659M (4/10)
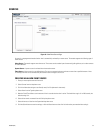
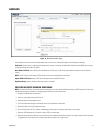
CREATING A NEW PROFILE
1. Place your mouse pointer over the Events tab.
2. Select Analytic Configuration from the drop-down menu.
3. Click the plus button (+) located in the Select Profile section.
4. Type a descriptive name for the profile in the Name box located in the Profile Settings section.
NOTE: Consider naming profiles based on their function. A more descriptive name makes it easier to recognize and locate a profile.
5. Select the Scene Type, Background, Fine Tuning, and Sensitivity settings from the drop-down menus located in the Profile Settings section.
6. Click the Calibrate Scene button to calibrate the scene.
NOTE: Set the perspective settings to reflect the camera’s angle. This information will make the object sizes you set on the next tab more
meaningful and help reduce the number of false alarms.
7. Select the behavior for the profile from the “Select behaviors” section.
8. Configure the settings for the behavior.
9. Click the Save button to save the profile. The new profile name appears in the Select Profile section.
REVISING A PROFILE
1. Place your mouse pointer over the Events tab.
2. Select Analytic Configuration from the drop-down menu.
3. Select the profile name from the Select Profile section. The settings for the profile appear.
4. Make the required changes to the profile settings.
5. Click the Save button to save the settings, or click the Reset button to clear all of the information you entered without saving it.
DELETING A PROFILE
1. Place your mouse pointer over the Events tab.
2. Select Analytic Configuration from the drop-down menu.
3. Select the profile name from the Select Profile section.
4. Click the minus button (–) located in the Select Profile section.
5. A dialog box opens and the following message appears: “Are you sure you want to delete the profile?”
6. Click the OK button to delete the profile.