


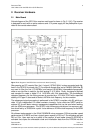
Document Title: 9
User’s Manual for the GPS Orion-S/-HD Receiver
Document No. Issue 1.0
GTN-MAN-0110 June 22, 2003
DLR/GSOCNo part of this document shall be reproduced in any form or disclosed to third parties without prior authorization.
For proper communication, these values must match the settings of the PC communication
port.
While the Orion receiver is most conveniently used via a dedicated monitoring and control
program (e.g. OrionMonitor), elementary operations may likewise be carried out via a stan-
dard terminal program. As an example, the HyperTerminal program provided with the Win-
dows operating systems can be used to monitor receiver output messages in real-time and to
record the data stream to a file. Vice-versa, commands can be loaded to the receiver from
pre-configured files or entered via the keyboard. In the latter case, the STX (0x02) and ETX
(0x03) characters marking the command start and end can be generated by pressing the
CNTL-B and CNTL-C keys, respectively. If desired, consecutive commands may be sepa-
rated by white space like blanks or line feeds. Please note, that the correct checksum must
be provided for each command to allow proper execution.
3.1.4 Start-Up and Initialization
At power-up the receiver performs the following initialization steps:
• The boot loader is executed and the program code is loaded from EPROM to RAM
memory.
• If non-volatile memory has been retained since the previous activation, the receiver
restores the latest almanac, broadcast ephemerides, ionospheric and UTC parame-
ters, trajectory aiding parameters, as well as the current time.
• If the receiver was temporarily disconnected from the backup power supply or the re-
spective NVM data are corrupted, the time, almanac and trajectory aiding parameters
are initialized with hard-coded default data (Note: The actual values used for the de-
fault initialization depend on the particular software release and may vary between
receivers). The ephemeris data are marked as unavailable.
• A boot message identifying the current software version is issued.
Subsequently, the signal tracking is started and the receiver starts outputting a predefined
sequence of messages at a 1 Hz rate. The same steps are performed when the reset button
on the interface board is pressed.
Depending on its previous usage the receiver should start tracking and deliver navigation
fixes between a minimum of 30 s (hot start with known time, position and ephemerides) and
a maximum of 15 min (cold start). To speed-up the signal acquisition various commands can
be employed to provide the receiver with a priori information. A comprehensive initialization
sequence is listed below. Some steps are optional and may be skipped as desired.
• To discard all existing receiver settings issue the CS (cold start) command followed
by a reset (or reboot) of the receiver. This will return the receiver into a native state
with time, almanac, and trajectory aiding parameters determined by the firmware de-
faults.
• Set the current date and time (using the SD and ST commands). For static receiver
operation an accuracy of 10 min is generally sufficient. For LEO operations and ini-
tializations in the free-flight phase of ballistic vehicles a maximum error of 10 s is tol-
erable.
• For unaided operation, set the geographic coordinates (using the IP command) or the
initial state vector (using the PV command). For static receiver operation an accuracy
of 1° is generally sufficient and the altitude can be assumed as zero (sea level).
• For aided operation set the trajectory parameters (using the LO command for LEO
operations or the LT and ET commands for ballistic trajectories).
• Load a set of current almanac parameters based on e.g. a YUMA almanac (using the
LA and F13 commands). If desired, the almanac may be complemented by iono-
spheric correction data and UTC leap second information (F15 command).