


Magellan eXplorist Geocache Waypoints
Magellan eXplorist 310 User Manual 17
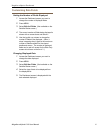
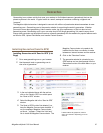
ID can be found in the upper right corner of the
web page describing the geocache.
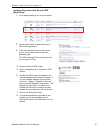
5. A “Save File” dialog window will open on your
computer. Save the le to your computer.
(The location of where the le is saved will
depend on your browser and how you have it
set up to save les.)
6. Turn your receiver on and connect it to your
PC with a USB cable.
7. Select “Connect to PC” on your receiver.
8. (You don’t need to do one geocache at a
time as explained above. Continue saving
geocache les until you have all you want for
this session.)
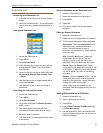
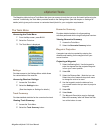
9. Open the “MAGELLAN” device that has been
installed on your computer.
10. Open the “Geocaches” folder in the
MAGELLAN directory.
11. Drag the GPX le (GC1FGDZ.gpx in this
example) to the Geocaches folder in your
receiver.
12. The geocache (or geocaches) are loaded
in your receiver and can be found from the
Geocaches menu option in the Main Menu.
(You need to disconnect or reboot the receiver
to exit the “Connect to PC” screen.)
The Magellan Communicator
The Magellan Communicator is used to communicate
between geocaching.com and your Magellan GPS
receiver. You can install the plug-in by using the
steps above or by going to the Magellan web site as
explained here.
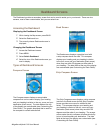
Direct installation of the Magellan
Communicator from www.magellangps.com
1. Go to www.magellangps.com and click on the
“Products” tab.
2. Select “Maps & Software”.
3. In the software section, select “Magellan
Communicator”.
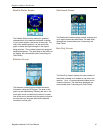
4. On the Magellan Communicator page
(www.magellangps.com/products/map.
asp?tab=0&PRODID=2301) select the
Download button.
5. When the download is complete, run the
Magellan Communicator le to install the
drivers. (If you get a Security Warning, press
‘Run’ to continue.)
6. When the Installation Wizard is done installing
the les, select ‘Finish’ to complete the
installation.
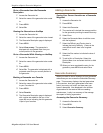
Installing Geocaches (Drag n Drop)
Users of geocaching.com who are not premium
members will have the ‘GPX eXchange File’ button
greyed out. It is recommended that non-premium
members use the “Send to GPS” button but it is
also possible to save the geocache as a LOC
Geocache File.
Installing Geocaches with Drag ‘n Drop
1. Go to www.geocaching.com on your browser.
2. Use the search tools on geocaching.com to
select a geocache to load.
3. Click on the “GPX eXchange File” button.
4. Files are saved to your computer with the
lename <GeocacheID>.gpx. The Geocache