


Magellan eXplorist Waypoints
Magellan eXplorist 310 User Manual 14
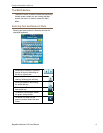
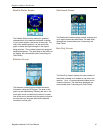
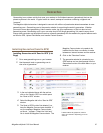
Go to a Waypoint from the Waypoint
Description
1. Access the Waypoint list.
2. Select the name of the waypoint to be routed
to.
3. Press MENU.
4. Select GO.
Viewing the Waypoint on the Map
1. Access the Waypoint list.
2. Select the name of the waypoint to be viewed.
3. The Waypoint Description page is displayed.
4. Press MENU.
5. Select View on map.
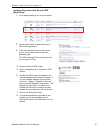
Marking a Waypoint as a Favorite
1. Access the Waypoint list.
2. Select the name of the waypoint to be added
to your Favorites list.
3. Press MENU.
4. Select Favorite.
5. The Waypoint Description page is displayed
with a yellow star added to the icon in the
upper left corner indicating that this waypoint is
part of your favorites.
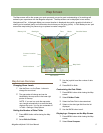
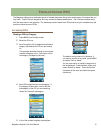
Waypoints and the Map Screen
Waypoints can be viewed on the Map screen using
the default icon or the icon you select while editing
the waypoint.
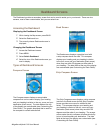
Creating a Waypoint while Panning
1. Select the Map screen.
2. Use the joystick to move the cursor.
3. This will put the Map into Pan mode. Keep
using the joystick in the direction of the map
you want to go to. Using the zoom buttons will
assist in getting to the desired point quickly
and accurately.
4. When you can see the point on the map you
want to create a waypoint for, press the MENU
button.
5. Select Add Waypoint.
6. The Waypoint Description page is displayed.
7. Edit the waypoint as needed.
8. Select the Disk icon.
9. Select Save as Waypoint.
10. Conrm the save.
Saving Your Current Location as a Waypoint
1. While viewing the Map screen press MENU.
2. Select Add Waypoint.
3. Edit the waypoint as desired.
4. Select the Disk icon at the bottom of the
display.
5. The waypoint is saved and you are returned to
the Map screen.
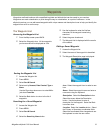
Waypoint Projection
A waypoint can also be created by entering the
distance and heading for the waypoint from your
current location.
Projecting a Waypoint
1. Select the Map screen.
2. Select the Main Menu icon in the lower left
corner.
3. Select the Waypoints icon.
4. From the Waypoint List press the MENU
button.
5. Select Add Waypoint.
6. Select Projection.
7. Select the Bearing eld. Use the keypad to
enter the degrees that the projected waypoint
is from your current position.
8. Select OK.
9. Select the Distance eld. (Note that you can
Select the units of measure drop-down menu
to change the units to be used.
10. Use the keypad to enter the distance from
your current location that you want to project a
waypoint.
11. Select OK.
12. Select Next>.
13. The Waypoint Description page is displayed.
Make the necessary edits and Select the Disk
icon at the bottom to save.