


3
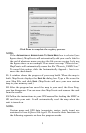
clude in your map. Use the
PAN ARROW buttons to move north, south,
east or west. Use the
ZOOM-IN and ZOOM-OUT (Z-IN or Z-OUT) buttons as
needed to close in on or back away from the area you're viewing.
3. Click the
DRAW MAP BORDERS button in the toolbar. Move the mouse
pointer above and to the left of the desired area. Click, hold down the
mouse button and drag diagonally down and to the right until the de-
sired area is enclosed with the green border box. Then release the
mouse button. You have just drawn a Map Border.
4. With the Map Border displayed, click the
ESTIMATE CUSTOM MAP SIZE but-
ton, on the Create Map toolbar. After a moment it will tell you your map's
file size. If it fits the card, click
OK to clear the message and jump to step 5.
If the map file is too large for the card, click
OK to clear the message, then
redraw your map border a little smaller. Click the
DELETE MAP BORDER but-
ton, click on any green border line, then re-draw a smaller border box. Use
the Estimate button to re-check the size until it is correct.
Click the OK button to clear the message box from your screen.
5. When your file is the right size, click the CREATE MAP button on the
Create Map toolbar. The program displays a message about copyright
and encryption.
6. If this is the first time you have tried to save a file to your memory
card, MapCreate will need to register the card. Make sure you have a
card in your card reader. Click
OK to continue. (Clicking Cancel ends
the process.) If you have already registered the card you are using, click
OK and skip to step 11.
Read the message, and then click OK to continue.