


59
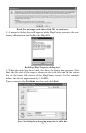
1. Center the Master Map display on the area where you want to
begin your route. Click the
CENTER MAP cross-hair button
then click the cross-hair mouse pointer on the area you want cen-
tered.
2. If needed, click the
ZOOM IN or ZOOM OUT buttons
so you can see enough detail to accurately place the route waypoints.
Tip:
As you move along your intended course, you may need to pan the
Master Map and periodically zoom in and out to see where to place
route waypoints, and where you are going next. The pan and zoom
buttons will always work, even when the
CREATE ROUTE command is
active. This way, you don't have to turn off Create Route just to
move the map.
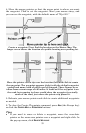
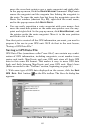
3. Click the
CREATE ROUTE button on the GPS Data Toolbar. Your
mouse pointer becomes an arrow with a route symbol , two way-
points connected by a magenta route line.
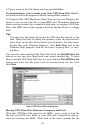
4. Move the mouse pointer so that the arrow point is where you want to
start your route. Click to set the first waypoint. Move your mouse away
and you can see the waypoint. A straight magenta route line now runs
from Waypoint 001 to your mouse pointer like a rubber band, showing
you a route is under construction.
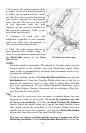
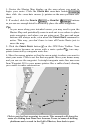
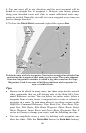
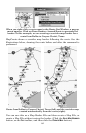
Click to set the first waypoint in a route. This example will show the
route of a fishing boat from Port Aransas, Texas, to some oil drilling
platforms and a wreck in the Gulf of Mexico, then back to port.