


GEK-95352
20
2. Place coil (without inlet / out-
let pipes C) in endshield and secure
loosely.
3. Stick inlet-outlet pipes C
through holes in end shield wall and
check line up of pipes and end
shield holes by screwing pipes
loosely into cooling coil elbow.
Pipes should be centered in holes in
end shield wall. Adjust cooling coil
as needed but Do Not Tighten
Parts Yet.
4. Thread part A over pipes and
screw A into end shield loosely.
Adjust position of cooling coil as
necessary to let pipes exit without
strain and then secure cooling coil
into end shield.
5. Remove parts A and C and put
pipe joint compound on threads. In-
spect outer end and slots in C pipes
and remove any burrs or sharp
edges to prevent damage to O-Ring
during assembly. Then screw pipes
C hand-tight into cooling coil el-
bows, being careful not to bend or
damage the cooling coil when tight-
ening C. Next, tighten C by using
wrench on hex fitting at inner end of
C.
6. Next, slide part A into place
and screw tightly into end shield,
being careful not to damage outer
surface of C where O-Ring will seat.
7. Check gap between endshield
wall and inner surface of A. If this
exceeds 1/4", endshield hole should
be tapped deeper.
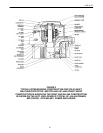
8. Check position of end of C
with respect to outer face of A. See
Figure 4 for limiting dimensions.
9. Install 3 set-screws E in A
120° apart and tighten securely to
lock A into position and keep it
from unscrewing. Set-screws should
bite into surface of endshield.
10. Be very careful not to damage
or mar outer surface of C where O-
Ring seats.
11. Re-check outer end and slot of
C and remove any burrs or sharp
edges to prevent damage to O-Ring
during assembly. Then lubricate O-
Ring and slide it into position
shown in Figure 4. Be sure to push
it in until it seats against A.
12. Slide part B into place and se-
cure with 3 socket-head screws F.
Tighten F screws until flange of B
seats solidly against A. There
should never be a gap between A
and B. Use ”Loc-Tite” on threads of
F-screws to prevent their unscrew-
ing.
Parts A and B compress the O-Ring
against C and seal oil into motor and wa-
ter into coil.
13. Pressure check entire system.
H. Insulation and Winding
Maintenance
1. General
For long life and satisfactory opera-
tion, insulated winding should be
kept clean and free of dirt, oil, metal
particles, and other contaminants. A
variety of satisfactory and accept-
able methods are available for
keeping equipment clean. The
choice of method will depend
greatly on time, availability of