


2001 Edelbrock Corporation
Brochure No. 63-0020
©
Rev. 10/01
Page 27 of 27
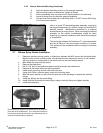
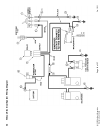
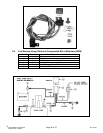
6.0 Solenoid Inspection and Maintenance.
1. Close valve on nitrous bottle.
2. Make sure all nitrous supply lines are free of pressure before removal of any system solenoid.
a. Empty main nitrous supply line at the nitrous bottle. Take care to not breathe or expose your
skin to nitrous.
b. Do not open pressurized fuel lines over a hot engine.
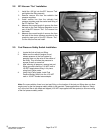
3. Remove nitrous solenoid from the engine and securely clamp it into a vise, taking great care not to
damage the solenoid.
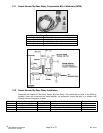
4. Remove the solenoid cover, retaining nut from top of the nitrous solenoid.
5. Remove coil and housing from nitrous solenoid base.
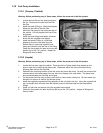
6. Unscrew stem from nitrous solenoid base. Do this by using a solenoid stem removal tool or by
“double nutting” the stem and unscrewing the stem from the housing body. Do not use pliers on
solenoid stem; damage to the stem will result.
7. Carefully remove the stem, spring and plunger from the solenoid base paying close attention to the
way they are assembled.
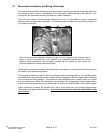
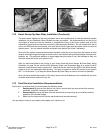
8. Examine the plunger seal for swelling, cuts and abrasions. The seal surface should be flat, except
for a small circular indentation in the center of the seal.
A seal that has been contaminated or over-pressurized will bulge from exposure to chemicals
other than nitrous oxide. It can appear to extend down from the plunger and be dome-shaped. A
contaminated seal may return to its original shape if left out in fresh air for approximately 48 hours.
It may then be returned to service. If it does not return to its original shape, it must be replaced.
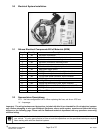
9. Clean the solenoid body. Do not use an oil-based solvent to clean any p
art of the solenoid.
Use paint thinner or electrical contact cleaner. Remove any contaminants that may be present.
Make sure solenoid body is clean, dry and free of oils before assembly.
10. Replace the O-Ring, plunger and piston spring.
11. Re-assemble solenoid by reversing disassembly procedure.