


High Out put In sig nia Si ren
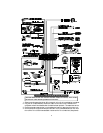
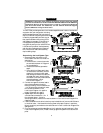
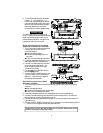
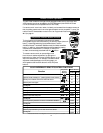
Mount the siren in the engine compartment away from hot or moving parts and where it
cannot be reached from under the vehicle, preferable opposite the exhaust system. Point the
siren down to avoid water collection (see the illustration).
1. You must firmly secure the siren to the engine bay firewall or a fender well using all three
sheet metal screws supplied.
2. Us ing the sup plied con nec tor, fasten the BLACK wire coming from the siren to the
YELLOW wire from the 24-pin connector on the control unit.
3. Connect the RED wire to the 5-amp fuse that is connected to the battery positive cable
clamp.
Fi nal Wir ing Con nec tions
1. Connect the two 14AWG RED wires from the 12-pin connector to the 30-amp fuseholders as
shown on page 4.
2. Connect the 16AWG RED wire from the 12-pin connector to the 20-amp fuseholder.
3. Connect the 18AWG RED wire from the 24-pin connector to the 5-amp fuseholder.
4. Attach the four fuseholders to the battery positive cable clamp.
5. Attach the 18AWG BLACK wire from the 24-pin connector to the battery negative cable
clamp.
NOTE: Power and test ac ces so ries af ter the ba sic sys tem has been tested.
In di vidu ally fuse all ac ces sory power and fuse panel con nec tions.
Smart Powe rUp™ 2
SmartPowerUp 2 ensures that the system powers up in the same state (disarmed, armed or valet
mode) it was in when power was removed. When you first power up the ACE 7500, it will silently
enter the disarmed state.
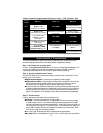
MAN DA TORY RPM PRO GRAM MING
NOTE: ACE 7500 will not operate properly without this pro gram ming step.
NOTE: If working on a diesel engine vehicle, you must first set the system for
diesel operation using the Installer-Programmable Features on pages 17-18.
1. Drive the vehicle outside the RoadShop bay and allow the engine to warm up.
2. With the engine still running and the transmission in PARK or NEUTRAL, enter the
valet code (✱✱ blank) on the PlainView 2 switch and immediately hold the ✱ button.
You’ll hear one chirp to indicate user programming mode.
3. KEEP HOLDING (about 12 more seconds) until you hear the 3-chirp installer
programming mode confirmation.
4. Select “Program RPM”: Press the PlainView switch blank button once, wait for 1 chirp,
then ✱ 5 times and wait for the 2 chirps to confirm that the RPMs have been set (if you
hear one chirp instead, check connection of the BLACK/GRAY wire).
5. If working on an automatic transmission vehicle, you must also set the transmission type
to automatic. See Installer-Programmable Features on pages 17-18.
6. Turn the ignition off to exit installer program mode.
De layed Cour tesy Lights
Some vehicles have a courtesy light delay or dimming circuit that interferes with an alarm being
able to detect the door trigger upon remote arming. If the delay or dimming lasts more than 5
seconds, turn on the Delayed Courtesy Lights feature noted in the Installer-Programmable
Features section on page 17. Please note that since this feature sets the system to arm the instant
the courtesy lights turn off, the Door Ajar Warning feature will not be available.
13