


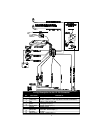
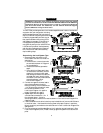

Re motely Ad just able Dual- Zone Piezo Sen sor
Mount this sensor in the passenger compartment, not in the engine compartment.
1. Firmly mount the sensor near the base of the steering column (if the steering column has a
rotating sleeve, firmly screw the sensor to the interior firewall, kick panel or trunk wall).
2. Mate the sensor to the connector with the BLACK, RED, and WHITE/BLUE wires.
3. After power-up, adjust the sensor as noted on page 15.
Glass Tam per ing Sen sor
Mount this sensor in the passenger compartment, not the engine compartment.
1. Mount the microphone holder so that it points into the passenger compartment, but will
not be exposed to direct sunlight.
2. Plug the microphone into the sensor (an optional second microphone can be added for
vans and other large vehicles for increased sensitivity and better discrimination).
3. Mate the sensor to the connector with the BLACK, RED and ORANGE wires.
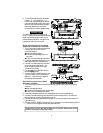
Aux il iary A with Se lecta ble Out put Type with AutoAc ti va tion
The Auxiliary A output (GRAY/VIOLET wire) can be programmed as either pulsed, latched
or timed and can be programmed to operate only when the system is disarmed (e.g., for use as
a remote trunk release). Note that the selectable output type is only programmable using the
CliffNet Wizard Pro. Auxiliary A output is activated by pressing the button on the
companion remote control or button 2 on the master remote control. The factory setting is
pulsed output (1 second ground). The latched output stays at ground until the button or
button 2 is pressed a second time, and the timed output stays at ground for any selected
duration between one second and four minutes. Current is limited to 0.15 amp. You can also
set this output to automatically activate every time the system is remotely-armed (perfect if
wiring as a timed output to close the electric windows and sunroof on European vehicles that
have an all-close feature). See Installer-Programmable Features on page 17 to change the type
of output, set AutoActivation and/or disable operation while the system is armed.
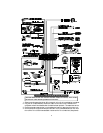
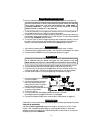
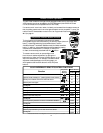
Euro pean Ve hi cle Win dow/Sun roof All-Close
If the door key can close the power windows/sunroof, you can make them automatically close
upon remote arming (CliffNet Wizard is required to program this feature):
1. Find the wire that shows +12V or ground when the key is held to lock in the door cylinder.
2. Tap a wire in to this wire and connect to terminal 30 of the relay.
3. If the wire shows (-) when the key is turned, connect terminal 87 to (-). If the wire shows
+12V when the key is turned, connect terminal 87 to 12V.
4. Connect the output of the alarm that can be set to AutoActivate to terminal 85.
5. Connect +12V to terminal 86.
8. Turn on the AutoActivate timed accessory upon remote arming feature as noted in the
installation manual for the alarm under Installer-Programmable Features.
8. Set the timer duration to proper time interval with two seconds added to that time
interval.En gine Bay Con nec tions.
9. Set Auxiliary Output A to Timer using the CliffNet Wizard.
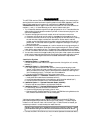
En gine Com part ment Con nec tions
Hood Trig ger
Vehicles with a ground-switching hood pin switch interface directly with ACE 7500 (on positive
switching Rolls-Royce vehicles, use a relay to invert polarity). If a switch cannot be located, you
must add a pin switch in a location away from water channels.
1. Connect the WHITE/BLACK wire to the hood pin wire.
12