


Installer-Programmable Features
To access the installer-programmable features, use the procedure defined in the User-Programmable s ection, but after completing
step 4, continue to press and hold the
✱ side of the PlainView 2 Switch for another 10 seconds. You will hear three confirmation
chirps indicating that the system is in installer-program mode.
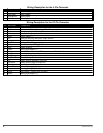
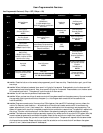
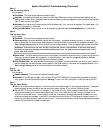
Table of Installer-Programmable Features: 1 chirp = OFF, 2 chirps = ON.
Fea ture
Select
Unmarked 1 Unmarked 2 Unmarked 3
✱ 1
Single/Double Lock Pulse
(1 chirp/2 chirps)
Channel 2
Timer Duration
(10 Seconds)
NOTE 1
Door Ajar Warning/Delayed
Courtesy Lights
(1 chirp /2 chirps)
✱ 2
Single /Double Unlock Pulse
(1 chirp/2 chirps)
Auxiliary Channel 2 type
(Pulsed /Timed/Latched)
(1 chirp /2 chirps/3 chirps)
Auxiliary Channel 2 Interlock
(On/Off)
✱ 3
Lock/Unlock Pulse
1 second/3 second
(1 chirp/2 chirps)
Arm/Disarm on Single Button
(Off/On)
NOTE 2
Auxilliary Channel 2 output
Activate as door unlock
NOTE 3
✱ 4
Door Lock Polarity
Positive/Negative
(1 chirp/2 chirps)
Diesel Engine /Petrol Engine
(1 chirp/2 chirps)
(Requires Optional
IntelliStart 4)
AutoActivate Auxiliary Channel 2
(On/Off)
✱ 5
Program RPM (Requires Optional
IntelliStart 4)
Program Optional
SmartWindows 4
Program Door Polarity
(Positive/Negative)
(1 chirp/2 chirps)
NOTE 1: Once this feature is selected, you will hear one chirp to confirm that the timer has started. You can set this anywhere from
one to 4.25 minutes (255 seconds). When the desired duration has been reached, press the unmarked
side of the PlainView 2 switch.
You will hear two chirps to confirm the new system timer duration.
NOTE 2: Must have a four button remote to use this feature. If this feature is disabled (the default sett
ing), then arm and disarm will
be on a single button.
NOTE 3 : Arm/Disarm on single button must be set to OFF to use this feature, auxilliary channel 2 output ty pe must be set to pulsed.
System Checklist & Troubleshooting
The fol low ing check list and trou ble shoot ing tips will as sure that you have in stalled the In
telliGuard 6000 cor rectly. If the sys tem does
not re act as noted, fol low the trou ble shoot ing tip(s) de noted with a black box be low that it em, then re peat the step. Each suc ces sive
step re quires that the pre vious step has been com pleted as in di cated.
Step 1.
Re-enable the courtesy lights.
In step 1 of the Important Information sec tion (the first tabbed section) in this binder, the in te rior cour tesy lights were disabled.
You must now re-enable the courtesy lights by re placing the fuse you re moved or re set the cour t esy light switch back to its nor mal
“DOOR” po si tion bef ore pro ceed ing.
Step 2.
Test the Im mo bi li za tion cir cuit.
n
Turn the ignition to the “ON” position and start the engine. Let the engine run for at least 10 se conds, then turn the ignition
“OFF.” After 30 seconds have passed, the AutoImmobilisation circuit will engage (indicated by a sl
ow flash of the LED). Turn
the ignition to the “ON” position. The en gine should not re spond (it should nei ther start nor c rank).
o Engine does not respond. This is the correct response, proceed to the next AutoImmobilisation test.
o Engine starts or cranks. Check the power and ground connections, then check to see if starter/ig ni tion/fuel pump or
im mo bi li sa tion cir cuit has been mis wired. Care fully re test the ve hi cle wires as noted in the
Starter and Ignition Immobilization
Cir cuit section on page 4.
In tel liGuard 6000/1298 9