


System Checklist & Troubleshooting (Continued)
n
Arm the IntelliGuard 6000 (either from inside or outside the vehicle) and wait 10 seconds. Turn the ignition to the “ON”
position.
o Engine does not respond and alarm triggers. This is the correct response, proceed to step 3.
o Engine starts or cranks. The starter im mo bi li sa tion cir cuit has been mis wired. Care fully re test the ve hi cle wires as noted
in the Starter or Ignition Auto Im mo bi li za tion Cir cuit section on page 4.
o Engine still starts or cranks after retesting all the wiring as noted on page 4, check the power and ground connections.
Then make sure the fuses are in the fuseholders, verify the control unit connectors are securely fa stened, verify the ignition
wires are connected to the true ignition line instead of a 12V or accessory line, and verify that t he transmitters are
programmed correctly.
Step 3.
Test the chirps.
Close all doors and arm the IntelliGuard 6000 by pressing the button on the remote control.
n
2 Chirps: This is the correct response. Proceed to step 4.
n
1 Chirp: If you hear only one chirp, the IntelliGuard 6000 had previously armed itself passively and by pre ssing the button, the
system disarmed (remote disarming is acknowledged with one chirp and one parking light flash). Dis arm and rearm the system.
n
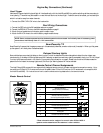
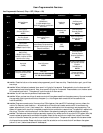
4 Chirps: If you hear 4 chirps ei ther im me di ate ly or 5-10 sec onds af ter the ini tial two chirps, a tri g ger or sen sor is open or
active, or the ve hi cle has de layed cour tesy lights and the De layed Cour tesy Lights fea ture has not been programmed on. Dis arm
with the re mote con trol, en ter the ve hi cle and turn on the ig ni tion. The LED will flash 1–10 times, pause, then re peat the same
number of flashes (the flash cy cle re peats five times for your con ven ience). Ref er to the foll owing chart.
Num ber of LED flashes be tween pauses Trig ger/sen sor in di ca tion
1 flash Glass Tampering Sensor
2 flashes Dual- Level Piezo Sensor
4 flashes* Door Trigger*
5 flashes Trunk Trigger (trunk only, if IntelliStart 4 has been installed)
6 flashes Hood Trigger (only if IntelliStart 4 has been installed)
7 flashes
An attempt was made to turn the ignition “ON” or start the engine while the
system was armed
10 flashes Power Interruption
* If the de layed cour tesy lights fea ture is ac ti vated, this trig ger in di ca tion will not be p ro vided.
o If the door trig ger is in di cated, ac ti vate the de layed cour tesy lights fea ture.
n
No chirps. If there are no chirps, ver ify that the Chirps fea ture (User-Programming - col umn 2, row 1) is “ On” and check the
wir ing con nec tions as noted in the High Output Si ren sec tion on page 4.
NOTE: If none of the troubleshooting techniques described in steps 3 - 7 corrects the problem, perf orm the
following diagnostics:
o Make sure the fuses are in the fuse hold ers.
oCheck the power and ground con nec tions.
o Ver ify that the con trol unit con nec tor is prop erly in serted into the con trol unit.
o Verify that the ig ni tion in put and out put wires are con nected to the true ig ni tion line inst ead of a 12V line. Find the true
ig ni tion line by fol low ing the appropriate steps of the Starter or Ignition Auto Im mo bi li sa tion Cir cuit sec tion on page 4.
o Ver ify that the trans mit ters are pro grammed cor rectly.
NOTE: If the 20A fuse blows upon arm ing:
o Disconnect the IntelliGuard 6000’s two parking light wires, replace the 20A fuse and rearm. If the fuse blows while the
parking light wires are dis con nected, the door locks are not wired cor rectly. Re con nect the ve hi cle’s power lock ing sys tem
to its origi nal con di tion, then re test the volt ages as in di cated in the Cen tral Door Lock ing/Un lock ing sec tion of this binder
and wire the locks as in di cated, then re place the 20A fuse.
10 In tel liGuard 6000/1298