


Navigation Settings
42
NAX980HD
English
Avoid Area Settings
You can register areas you do not want to pass
or areas that often get congested as an Avoid
Area. When you register the Avoid Areas, you
can set the system to calculate routes avoiding
the registered areas. ➜ “Setting the conditions
of the route calculation” (P.37)
Up to 10 Avoid Areas can be registered. You can
edit the registered Avoid Areas.
Note:
You can also register/edit them from the [Stored
Data] of the navigation settings. ➜ “Avoid Area” (P.
46)
To register an Avoid Area
1. Touch the [Avoid Area Settings] key.
The list screen of Avoid Areas is displayed.
2. Touch the [None (Add New)] key.
3. Search the area to avoid by a similar way as
for entering a destination.
The setting screen of the Avoid Area is
displayed with the map of area found.
4. Touch the desired menu item to set.
[Rename]
You can change the name of the Avoid Area.
Enter the name, then touch the [OK] key.
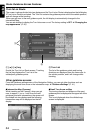
[Resize Area]
You can change the size of the Avoid Area in
5 steps. Touch the [Large], [I], [Medium],
[i], or [Small] key.
[Freeway (incl.)]
You can set whether to avoid freeways
passing the Avoid Area.
•[included] :Avoided.
•[not included] :Not avoided.
[Delete]
Delete the current Avoid Area.
[]
You can correct the location of the Avoid Area
by moving the cursor on the map.
5. Touch the [OK] key.
To edit an Avoid Area
1. Touch the [Avoid Area Settings] key.
2. Touch the Avoid Area you wish to edit.
3. Touch the desired menu item to set, and set it
by a similar way as for registering Avoid
Areas. ➜ Step 4 above
4. Touch the [OK] key.
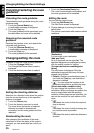
Tracking Display Settings
The system can display track data for one trip
(from ACC ON to OFF) from the place of
departure up to a distance of 100 km on the map.
The track from the current location up to 20 km
can be registered for up to five tracks, and can be
edited. The tracks on the map are displayed
using the color of the mark displayed left of the
registered name.
You can also set the system to always display the
current track.
Note:
You can also register/edit them from the [Stored
Data] of the navigation settings. ➜ “Stored
Tracking” (P. 46)
1. Touch the [Tracking Display Settings] key.
The list of track data is displayed.
2. Touch the desired menu item.
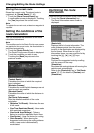
To register a track
Registers the current track data.
1. Touch the [None (Add New)] key from the list
of track data.
2. On the displayed confirmation screen, touch
the [Yes] key.
To show/hide track
1. Touch the [ON] or [OFF] key from the list
screen of track data.
The setting of the track data display is
changed. To set to always display the current
track, touch the [ON] key of the “Current
Tracking”.
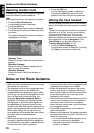
To edit a registered track
1. Touch the [Edit] key of “(Registered name)”
from the list of track data.
For the “Current Tracking”, only the [Map]
and [Delete] key are displayed.
[Map]
You can confirm the registered track data on
the map.
[Rename]
You can change the name of the registered
track data.
[Replace]
Deletes the registered track data, and register
the current track data.
[Delete]
Deletes the registered track data.
[OK]
Terminates the editing, and returns to the list
of track data.