


CT-5000 Installation Guide P.19
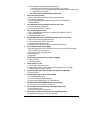
• The Parking Lights and L.E.D. will flash the five events stored in memory.
The first four playback codes are Start Failure Events, while the last playback code is an
Intrusion Code. There is a pause after each event code is played back.
The system will play back the most recent event first, then the second most-recent, and so
on. If there are no events at all to report, the Parking Lights will give one long flash.
Start Failure Codes via Parking
Lights
1 x = No Start
3 x = Hardware Reset
4 x = Brakes
5 x = No Tach cut-off
6 x = Hood
7 x = Engine Running, no Ignition
detected, or Tach before Start
10 x = Alarm condition
Intrusion Codes
1 x = Power-up Reset: Battery
disconnected / reconnected or
dead…
2 x = Doors intrusion
3 x = Shock Sense
4 x = Hood
5 x = Panic
6 x = Ignition
Note: “x” stands for one flash of the Parking Lights
Intrusion Codes via LED light
If there has been an intrusion in the vehicle while it was locked and armed, the LED will
provide an intrusion code corresponding to the type of the intrusion which took place. The
LED intrusion codes are flashed in continuous loops. They are the same codes as those
provided during Events Playback:
1 x = Power-up Reset: Battery
disconnected / reconnected or
dead…
2 x = Doors intrusion
3 x = Shock Sense
4 x = Hood
5 x = Panic
6 x = Ignition
Installation Order
The following is a suggested order for the Installation procedure. It is intended as guide for novices,
to help make the process of installing a remote start module easier. Time is wasted by rewiring the
module when mistakes are made, also the neatness of the install is lessened every time the
module is taken down and the wiring is “corrected”. A Messy install is harder to trouble shoot if
there are problems later on. The actual “how to install” is not covered by this list, the order of the
installation processes is the focus.
− Before you get started, make sure the vehicle is starts and idles properly with the Ignition key,
and that the electrical system is not compromised in any way.
− After deciding what options are to be added to the basic install, you can start by looking for the
wires that will be needed.
− Remember to take care when removing the panels that are covering the wires you are
searching.
− Once all of the wires have been found, they should be hot wired to verify that they are the
correct wires you will need for the installation.
− When all the wire pass the hot wire test, they can be stripped to expose the wire ( over one inch
of plastic should be removed).