


alarm to immediately sound for the complete 60 second alarm cycle.
B. While the system is armed, the red dash mounted L.E.D. will
constantly flash, discouraging any would be thieves.
C. Any light impact to the vehicle glass or body panels will cause the
system to immediately sound the warning chirps, discouraging any
further attempts to enter the vehicle.
D. Any forceful impact to the vehicle will cause the system to immedi-
ately trigger for the complete 60 second alarm cycle. At the end of the
cycle, the alarm will re - arm itself, and resume monitoring the vehicle.
3. Disarming the System
A. When you return to the vehicle, press and release the larger arming
button on the keychain transmitter. The system will respond with
“ DISARMED “ ( two chirps ).
B. The red dash mounted L.E.D. will turn off, indicating that the system
is disarmed, and it is safe to enter the vehicle.
4. Disarming After an Intrusion
When disarming, if the system responds with “ INTRUSION “ ( four
chirps ), you are being alerted that the alarm was triggered during your
absence. Additionally, the red dash mounted L.E.D. will blink 3 times ..
pause .. blink 3 times .. etc., to provide an added visual indication that
the alarm had been triggered.
To clear the L.E.D. intrusion flash pattern,
A. Arm the system, then immediately disarm the system.
B. The L.E.D. will turn off, and the system will be reset for normal
operation.
5. Decreasing the Sensitivity of the Shock Sensor via the
Keychain Transmitter
There may be some circumstances when you will want to arm the
system, but decrease the sensitivity of the shock sensor, or simply turn
the shock sensor off. This feature can be useful during extreme
thunderstorms, or when parking on or near heavy construction sites.
To arm and decrease shock sensitivity,
A. Follow the normal arming procedure by pressing the larger button on
the keychain transmitter.
B. Immediately after arming, press and release the smaller button on the
keychain transmitter.
C. In approximately five seconds, the siren will sound one long chirp,
indicating that the sensitivity of the shock sensor has been reduced
30 percent.
To arm and turn the shock sensor off;
A. Follow the normal arming procedure by pressing the larger button on
the keychain transmitter.
B. Immediately after arming, press and release the smaller button on the
keychain transmitter two times.
C. In approximately five seconds, the siren will sound one short chirp,
followed by one long chirp, indicating that the shock sensor has been
turned off.
IMPORTANT ! Any time the shock sensor has been adjusted using the
keychain transmitter, disarming then re arming the system will return the
shock sensor to its normal operating sensitivity.
6. Remote Panic Operation
The alarm can be activated via the keychain transmitter to draw
attention to your vehicle during an emergency situation.
To activate the panic feature;
A. Press and hold the larger button on the keychain transmitter for 3
seconds.
B. The alarm will sound, and continue to sound for 60 seconds.
C. To silence the alarm before the 60 second shutdown, press and
release the larger button on the keychain transmitter.
WARNING ! In most areas, it is illegal to activate the alarm while the
vehicle is moving. For the safety of your passengers and other
motorists, do not activate the alarm while your vehicle is in motion.
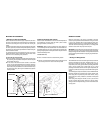
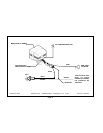
7. Emergency By - Pass
If you lose or misplace your transmitter, or the transmitter fails to disarm
the system due to poor battery condition, you must by - pass the security
system.
To do this;
A. Open the driver’s door. The alarm will sound.
B. Pull the hood release lever, and open the hood.
C. Locate the RED wire from the siren control module, and remove the
fuse from the fuseholder.
D. Do not replace this fuse until your transmitters are repaired or
replaced.
E. When re - inserting the fuse, you will need to reprogram your
transmitters. ( refer to “ PROGRAMMING THE KEYCHAIN TRANS-
MITTERS ).
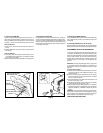
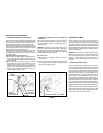
8. Replacing the Transmitter Battery
The keychain transmitters have a small, red L.E.D. visible through the
top cover. This L.E.D. can be used to indicate battery condition. You will
also notice a decrease in effective transmitter range as the battery
deteriorates.
The replacement battery must be a 12 volt type GP23A or equivalent.
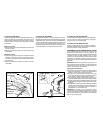
To replace the transmitter battery;
A. Remove the small phillips head screw from the bottom of the
transmitter, and carefully pry the top cover ( button side ) away from
the transmitter.
B. Remove the discharged battery, making note of the orientation of the
+ and - contacts, and dispose of properly.
C. Install the new battery, taking care to place the + and - contacts in the
correct position.
D. Replace the transmitter cover, taking care not to damage the L.E.D.
or switches on the circuit board.
E. Replace the small phillips head screw through the bottom of the
transmitter.
TROUBLESHOOTING :
Symptom : The siren does not chirp when the harness is first plugged
Page 4