


Page 3
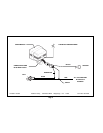
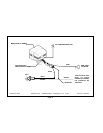
You will notice (4) additional wires, which come directly out of the rubber
wire exit boot from the siren control module, and are not part of the main
harness. These wires are used to customize the installation, and are
required in some vehicles.
1. Thin BLACK Wire
This is the antenna wire for the receiver that is built into the siren control
module. Fully extend this wire, and route it as high in the engine
compartment as possible, for maximum transmitter range.
2. BLUE Loop Wire
This wire exits the rubber boot, and immediately loops back into the
rubber boot.
The siren control module is programmed at the factory for voice
activation. If you wish to eliminate the voice response of the system
( replace the word “ ARMED “ with one single “ chirp “ - replace the word
“ DISARMED “ with two “ chirps “ - and replace the word “ INTRUSION
“ with four “ chirps “ ), simply cut this blue wire loop, and individually
insulate both sides with electrical tape.
NOTE : The “ ATTENTION INTRUSION “ voice message during the 60
second alarm cycle will always be active. There is no way to eliminate
this voice message.
3. WHITE Loop Wire
This wire exits the rubber boot, and immediately loops back into the
rubber boot.
Three minutes after the alarm has been armed, the voltage sensing
circuitry becomes active. This voltage sensing monitors the voltage level
of the vehicle, and when it sees a change ( i.e. a door opens, and the
interior light turns on ), the alarm is triggered.
Many vehicles incorporate an electronic cooling fan, which will automati-
cally switch on after the vehicle has been turned off. If this fan switches
on shortly after the alarm has been armed, the system will not trigger due
to the three minute delay.
If your vehicle does not have an electronic cooling fan which turns on
after the vehicle has been turned off, you may elect to by pass the three
minute arming delay of the voltage sense circuit. The system can be
modified so that six seconds after arming, the voltage sensing circuitry
becomes active. The three minute time delay can be eliminated by
cutting the WHITE wire loop. After cutting the WHITE wire loop,
individually insulate both ends of the wire with electrical tape.
Do not cut this loop if your vehicle is equipped with an electronic cooling
fan, as you will experience false alarms.
4. GREEN Loop Wire
This wire exits the rubber boot, and immediately loops back into the
rubber boot.
Cutting this wire will eliminate the voltage sensing feature of the alarm.
When this wire is cut, opening the doors will not trigger the system.
This loop wire should be cut only if you want to protect the vehicle from
sudden impacts to the glass or body panels, but do not want the alarm
to trigger when a door has been opened.
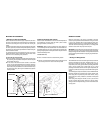
ADJUSTING THE SENSITIVITY OF THE SHOCK SENSOR
The purpose of a shock detector is to “sense” strong impacts to the
vehicle’s glass and body panels, but ignore light bumps to the vehicle.
This alarm is programmed to report these impacts in two ways.
A lighter impact will cause the alarm to sound a series of short “chirps”,
warning anyone tampering with the vehicle to stop immediately.
A more forceful impact will cause the alarm to sound for it’s full 60 second
cycle, informing you that a serious violation attempt has occurred.
IMPORTANT ! Setting the sensitivity of the shock sensor too high will
cause false alarms. A substantial amount of force is required to actually
break automotive glass, and the shock sensor should be set accord-
ingly.
Before proceeding with the adjustment, verify that all screws securing
the siren control module to the bracket, and securing the bracket to the
vehicle, are securely tightened.
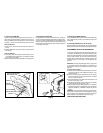
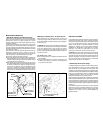
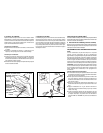
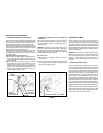
To adjust the shock sensor;
A. Locate and remove the small rubber plug on the back of the siren
control module.
B. Gently turn the adjustment screw fully counter - clockwise, then
clockwise approximately 1/8 of a turn. Do not over turn this screw, as
maximum rotation is approximately 270°. You should stop applying
pressure as soon as you feel a slight amount of resistance.
C. Close the hood, arm the alarm ( ARMED or “ 1 CHIRP “ ), and allow
six seconds for the shock sensor to stabilize.
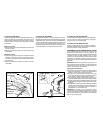
D. Firmly strike the front bumper of the vehicle with the side of a closed
fist, considering the amount of force required to break a window.
CAUTION ! Never perform this test on the vehicle’s glass, as you may
break a window.
E. If the alarm did not sound, or if only the warning chirps were activated,
then the sensitivity will need to be increased. Disarm the alarm, and
open the hood to gain access to the siren control module.
F. Gently turn the adjustment screw approximately 1/8 turn clockwise (
increasing sensitivity ), and repeat the test.
G. Repeat this procedure until a firm strike causes the alarm to trigger,
and a less forceful impact causes the alarm to sound the warning
chirps.
H. When the adjustment is set, replace the rubber plug on the back of
the siren module.
OPERATING THE SYSTEM
In this section, the operation of the system is described according to the
voice messages that are programmed into the siren control module. The
equivalent chirp tones are shown in parenthesis for those users that
have disabled the voice ( see blue wire loop ).
1. Arming the System
A. Exit the vehicle, and close and lock all doors.
B. Press and release the larger arming button on the keychain transmit-
ter. The system will respond with “ARMED” ( one single chirp).
C. The red dash mounted L.E.D. will begin to flash, and after approxi-
mately six seconds, the shock sensing feature of the system will be
activated. The voltage sensing circuit will begin its countdown, and
after approximately three minutes, opening a light activated door will
trigger the alarm.
IMPORTANT ! If the WHITE loop wire was cut during the installation
procedure, the voltage sensing feature of the alarm will become active
six seconds after arming the system ( see COMPLETING THE
INSTALLATION, WHITE Loop Wire ). You will not need to wait the three
minutes before opening a door will cause the alarm to trigger.
2. Protection While the System is Armed
A. Opening a door ( or any light activated entry point ), will cause the